Tasty Homemade Pancakes: The Easiest Fluffy Pancake Recipe Ever

Mastering Pancakes from Scratch Made Easy
Let me spill the pancake secrets that'll have you flipping breakfast like a pro! You know that frustration of ending up with pancake disasters instead of fluffy stacks? Well, worry no more. The key to pancake perfection is a duo: having the right gear and nailing those ingredient measurements.
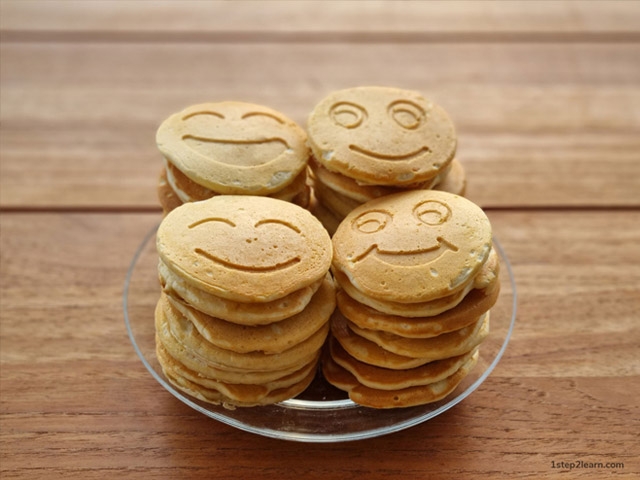
Equipment
- Frying pan (preferably a pancake pan of 7 hole)
- Big bowl
- A small glass bowl
- Fork
- Tablespoon
- Ladle
- Silicone Spatula
Ingredients for 28 Pancakes
- 2 eggs
- 40 grams of butter
- 4 tablespoons of white sugar
- Half a teaspoon of salt
- A cup and a half of flour (300 ml in a measuring cup)
- 10 gram bag of baking powder
- A glass of milk (200 ml in a measuring cup)
Directions
- Place 40 grams of butter in a glass bowl.
- Microwave the butter to melt it.
- Use 2 fingers to grease the pan with butter (once for every 28 pancakes).
- Heat the pan for approximately 5 minutes.
- Break 2 eggs into the large bowl.
- Beat the eggs using a fork.
- Pour the melted butter from the glass bowl into the large bowl with the eggs, and mix them.
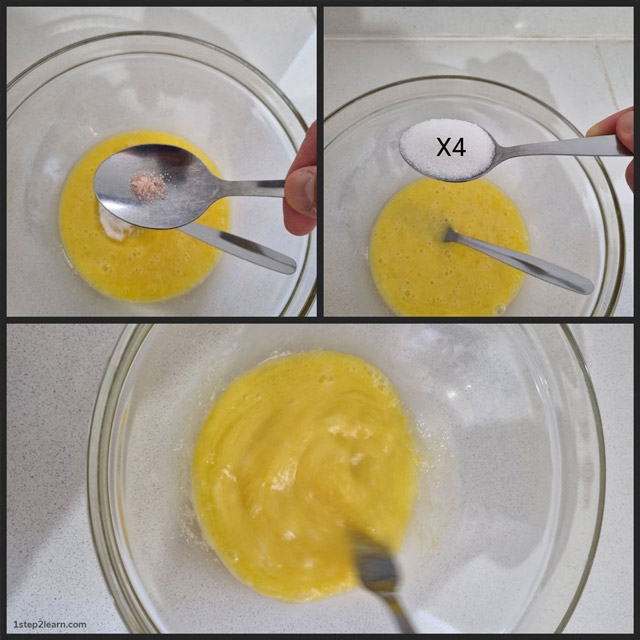
- Add 4 tablespoons of white sugar and mix.
- Add half a teaspoon of salt and mix.
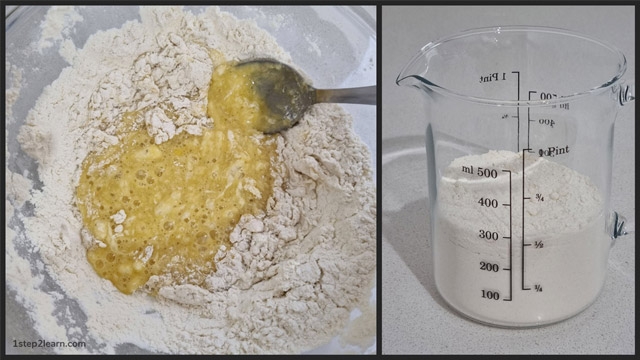
- Pour a cup and a half of flour (using a measuring cup of 300 ml) into the bowl and mix using a spoon.
- Add 10 grams of baking powder and mix.
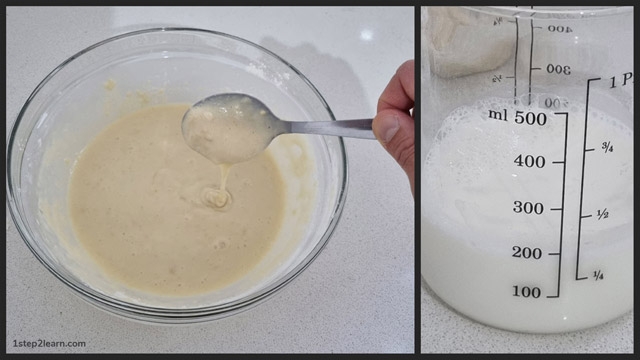
- Pour a glass of milk (using a measuring cup of 200 ml) into the bowl and mix.
- Use a ladle to pour the batter into the pan.
- After 2-3 minutes, flip the pancakes.
- After an additional 2 minutes on the other side, remove the pancakes from the pan.
- If you want to keep the pancakes warm and serve all 28 at once, place them in a pot with a lid.
You're all set to create a delicious stack of homemade pancakes. Enjoy the cooking adventure!
If this is your first time making pancakes or you're not entirely sure about the preparation method, simply follow the detailed explanation provided.
"Pancakes: a reason to wake up early."
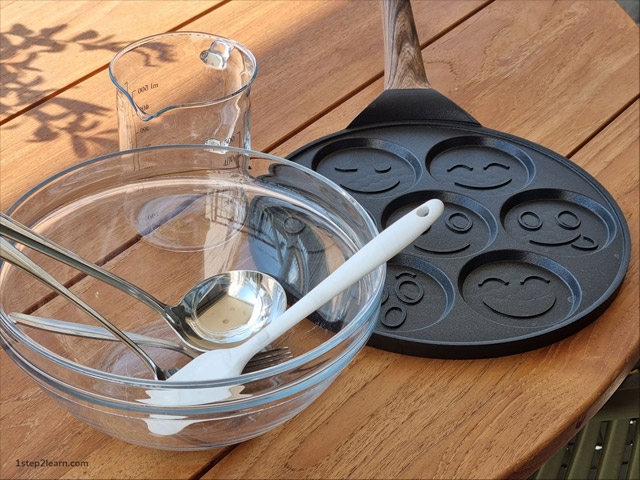
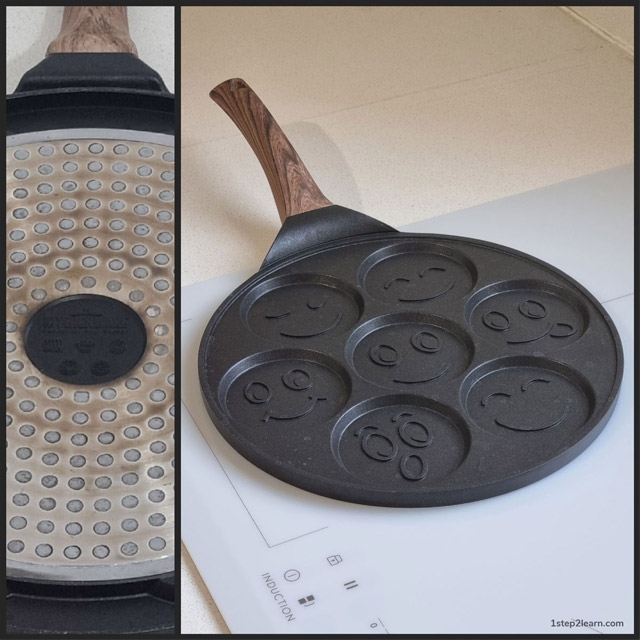
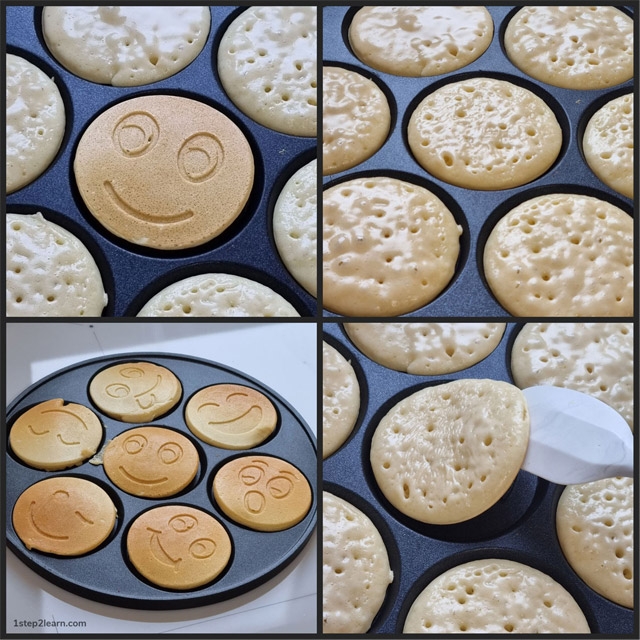
Pancake Pan 7 Hole
Let me spill the beans on my secret weapon for pancake perfection: my trusty 7-pancake induction pan. It's like having a kitchen wizard that streamlines the whole process and turns pancake-making into a breeze. We all want our pancake prep to be a smooth ride, right? Well, this pan is like the VIP pass to breakfast bliss. These days, snagging one won't break the bank, and let me tell you, it's an investment that keeps on giving.
What's the magic, you ask? No more fretting over how much batter to pour – this pan's got handy templates to guide you, making each pancake uniform and perfectly sized. The clever slots in the pan are your ticket to flawless flips, no acrobatics required.
Time, my friend, is of the essence. And this pan's got your back there too. With space for 7 pancakes per round, you're maximizing that frying surface and shaving off precious minutes. Imagine it: a symphony of sizzling pancakes, a kitchen filled with that irresistible aroma, and the promise of a perfect stack.
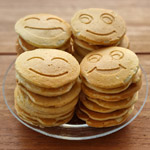
But that's not all – presentation is key. I've chosen a pancake pan with the cutest smiles imprinted. Talk about turning breakfast into a happy affair! Not only are your pancakes uniformly shaped and delightfully fluffy, but they come with a bonus – a cheerful smiling smiley to brighten up your plate.
Butter
Let's dive into the buttery details. Grab a 40-gram hunk of that golden goodness and pop it into a trusty glass bowl. I get it, measuring butter can feel a bit like solving a puzzle, but here's the scoop: even if you're not hitting that 40-gram bullseye spot-on, don't sweat it – the pancakes still come out like fluffy dreams.
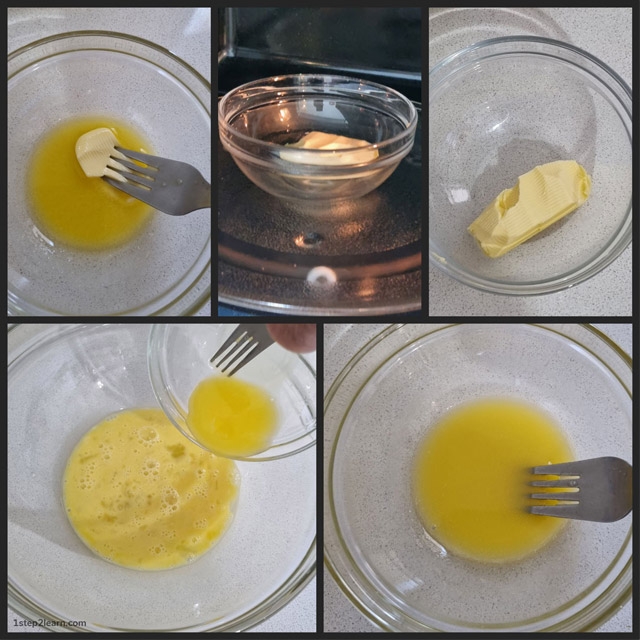
Now, it's butter-melting time. The key here? Patience and precision. Give that butter a 30-second whirl in the microwave – just enough to get the melting party started. If you spot a stubborn lump or two, fear not! A gentle fork-friend will smooth things over. Need a little extra melting love? Toss it back into the microwave for 10-20 seconds, but be a butter guardian – no exploding allowed!
Remember, that glass bowl is holding some serious heat, and the butter's like, "Hey, I'm not done melting yet!" So keep your cool and focus on vanishing those butter lumps – a smooth mixture is your aim.
Why the glass bowl, you ask? Oh, it's a game-changer. Easy cleanup? Check. Butter's delicate taste preserved? Double check.
Grease the Pan With Butter
As you place 40 grams of butter in the bowl, let's amplify its role. With the same knife, carve a bit for the pan. Employ two fingers to elegantly coat the pan's surface, ensuring non-stick finesse. Remarkably, this buttering ballet holds sway for all 28 pancake rounds – no need for repeat applications.

Heat the Pan
Before you dive into pancake perfection, remember this golden rule: the pan needs to be sizzling hot. Skipping this step could lead to a tale of two rounds – the first batch golden and fluffy, the second, not so much. So here's the scoop: while you're whisking up that pancake batter magic, let your pan have a little warm-up session. It's like giving your pancakes the VIP treatment from the get-go.
To save time, I'd suggest getting the pan fired up while you're still in batter mode. You're looking at a cozy 5-10 minutes of heating time, depending on how eager your pan is to play its part. Remember, this hot start is your secret weapon to evenly cooked, picture-perfect pancakes, every single time. So let the pan sizzle, let the batter flow, and prepare for pancake paradise on your plate.
Eggs
Crack two eggs into the spacious embrace of your large bowl, and with a trusty fork in hand, give them a gentle scramble. Imagine the yolk and protein doing a delightful dance, merging into a harmonious concoction. As soon as this duo is perfectly blended, it's time for a superstar entry – the melted butter. Pour that liquid gold into the mix and let the fork work its magic once again.
Sugar and Salt
Now, let's infuse that batter with a touch of sweetness. Grab your culinary wand and sprinkle in 4 tablespoons of pure white sugar, then stir it all together to create a symphony of flavors. And for that hint of balance, a dash of salt joins the party. With the finesse of a maestro, sprinkle in half a teaspoon of salt and give it another whirl.
Flour
Let's embark on the flour journey! Measure out 300 ml of flour, which is essentially a cup and a half, using a measuring cup. Here's a neat trick to keep things tidy: use a spoon to transfer the flour, ensuring you avoid any kitchen confetti mishaps. Now, this is where the spoon takes the stage as your culinary partner. As you mix, remember: gentleness is the secret here.
Embrace any lumps that might appear; they're like little surprises waiting to melt into the batter magic. Gradually, you'll notice the batter thickening, creating a hearty foundation for those dreamy pancakes. But hold tight, we're not done yet. That milk we're about to introduce is the game-changer.
Milk
Time to add a creamy touch to the pancake canvas! Pour 200 ml of milk, which is a cup's worth, from a measuring cup into the batter. Grab your trusty spoon and gently blend it in. Remember, there's no need for a vigorous mix here – a soft touch is the way to go. Embrace any lumps that tag along; they're totally cool. They'll vanish into thin air as the batter works its magic, transforming into the canvas for your fluffy pancake artistry.
Pancakes in 10 Minutes
If time's on your side, let it rest for half an hour. Urgency calling? No worries. Even if you skip the waiting game, the pancakes will shine. Just make sure you follow the steps – from pan preheating to crafting that batter – and guess what? In just 10 minutes, you can have a plateful of 7 pancakes that's all about speed and satisfaction.
Pouring the Pancake Into the Pan
Now comes the art of pouring – a delicate dance of batter and pan. Armed with a trusty ladle, I pour the batter into the cozy nooks of the pan. It's a balancing act – not too much, lest we end up with pancakes of a substantial girth. The batter, you see, is on the thicker side, so it takes a moment for it to elegantly spread within the pan's embrace, forming that iconic circular shape we all adore.
With each pancake, you become a batter virtuoso. Experience reveals the perfect ladleful, a secret learned through each sizzle and flip. And speaking of tools, the spoon is also a contender in this culinary tango. Its results are equally impressive, but the ladle steals the show when it comes to convenience and tidiness.
How to Flip a Pancake
Assuming that pan's sizzling hot, after about 2-3 minutes, it's time to unveil the first side of your masterpiece. Now, here's where your taste buds and culinary conscience collide. As much as we adore a bronzed pancake, it's wise to tread the line – a little browning is good, but let's not dry out those fluffy wonders. This, my friend, is the moment of laser focus.
How do you know when to turn? Nature's clues, of course! Look for those bubbles forming on the pancake's surface, a surefire signal that magic is happening. Around 2 minutes in, slip your silicone spatula beneath a corner. If it lifts gracefully without any batter sliding off, consider that your green light. And hey, take a peek – check the shade of brown. Too deep? Ease up on the heat's intensity next time.
Now comes the graceful flip – it's like a pancake pirouette. With care, turn it over while guarding that perfect round shape. And here's a trick: study your pan's behavior. Is the heat playing fair all around, or are there spots that need extra attention?
Once all your pancakes are flipped and ready to shine, give them about 2 more minutes on the second side. And here's the golden rule: while we adore that caramel hue, let's not get carried away. Keep a vigilant eye on the bottom, ensuring it doesn't darken beyond deliciousness.
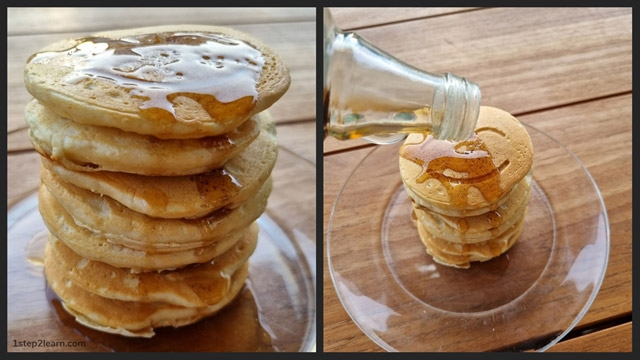
Maple Syrup
Ah, the final touch to pancake perfection – the glorious cascade of maple syrup. With their airy texture, these pancakes are like fluffy sponges, ready to soak up that liquid gold. My personal touch? I love drizzling the syrup generously over a stack of pancakes, letting it trickle down in sweet harmony. And when it comes to maple syrup, I'm all about that organic Canadian goodness. It's a culinary partnership that guarantees a symphony of flavor in every bite.
A Symphony of Toppings and Flavors
Elevate your pancakes with irresistible toppings and sauces:
- Butter, Melted
- Authentic Canadian Maple Syrup
- Decadent Chocolate Spread
- Freshly Sliced Bananas
- Juicy Peach Slices
- Sweet Strawberries
- Luscious Mixed Berries
Transform your pancakes into a culinary masterpiece with these delightful toppings and sauces, each bringing its own burst of flavor and texture to the table. Whether you're a classic butter lover, a maple syrup enthusiast, or craving the sweetness of fruits and chocolate, these options promise to tantalize your taste buds and make your pancake experience truly unforgettable.