Free Drawing Course for Beginners: Discover Your Hidden Talent

Introduction
Whether you're an absolute beginner or someone who has dabbled in drawing before, this course is designed to help you develop your drawing skills and gain confidence in your ability to draw.
First things first, I want to assure you that everyone can draw. It's a skill that can be learned and developed with practice, patience, and guidance. So, don't worry if you think you're not talented or you don't have a natural ability to draw.
With this course, I'll guide you through the process step by step, so you can build your skills and become more confident in your abilities.
We'll start with the basics of drawing, including how to hold a pencil, how to make marks on paper, and how to create basic shapes and forms. Throughout the course, I'll provide you with plenty of tips and tricks to help you improve your skills and gain confidence in your abilities.
Remember, the most important thing when it comes to drawing is to practice regularly. With each drawing, you'll learn something new and improve your skills. So, let's get started on this exciting journey together!
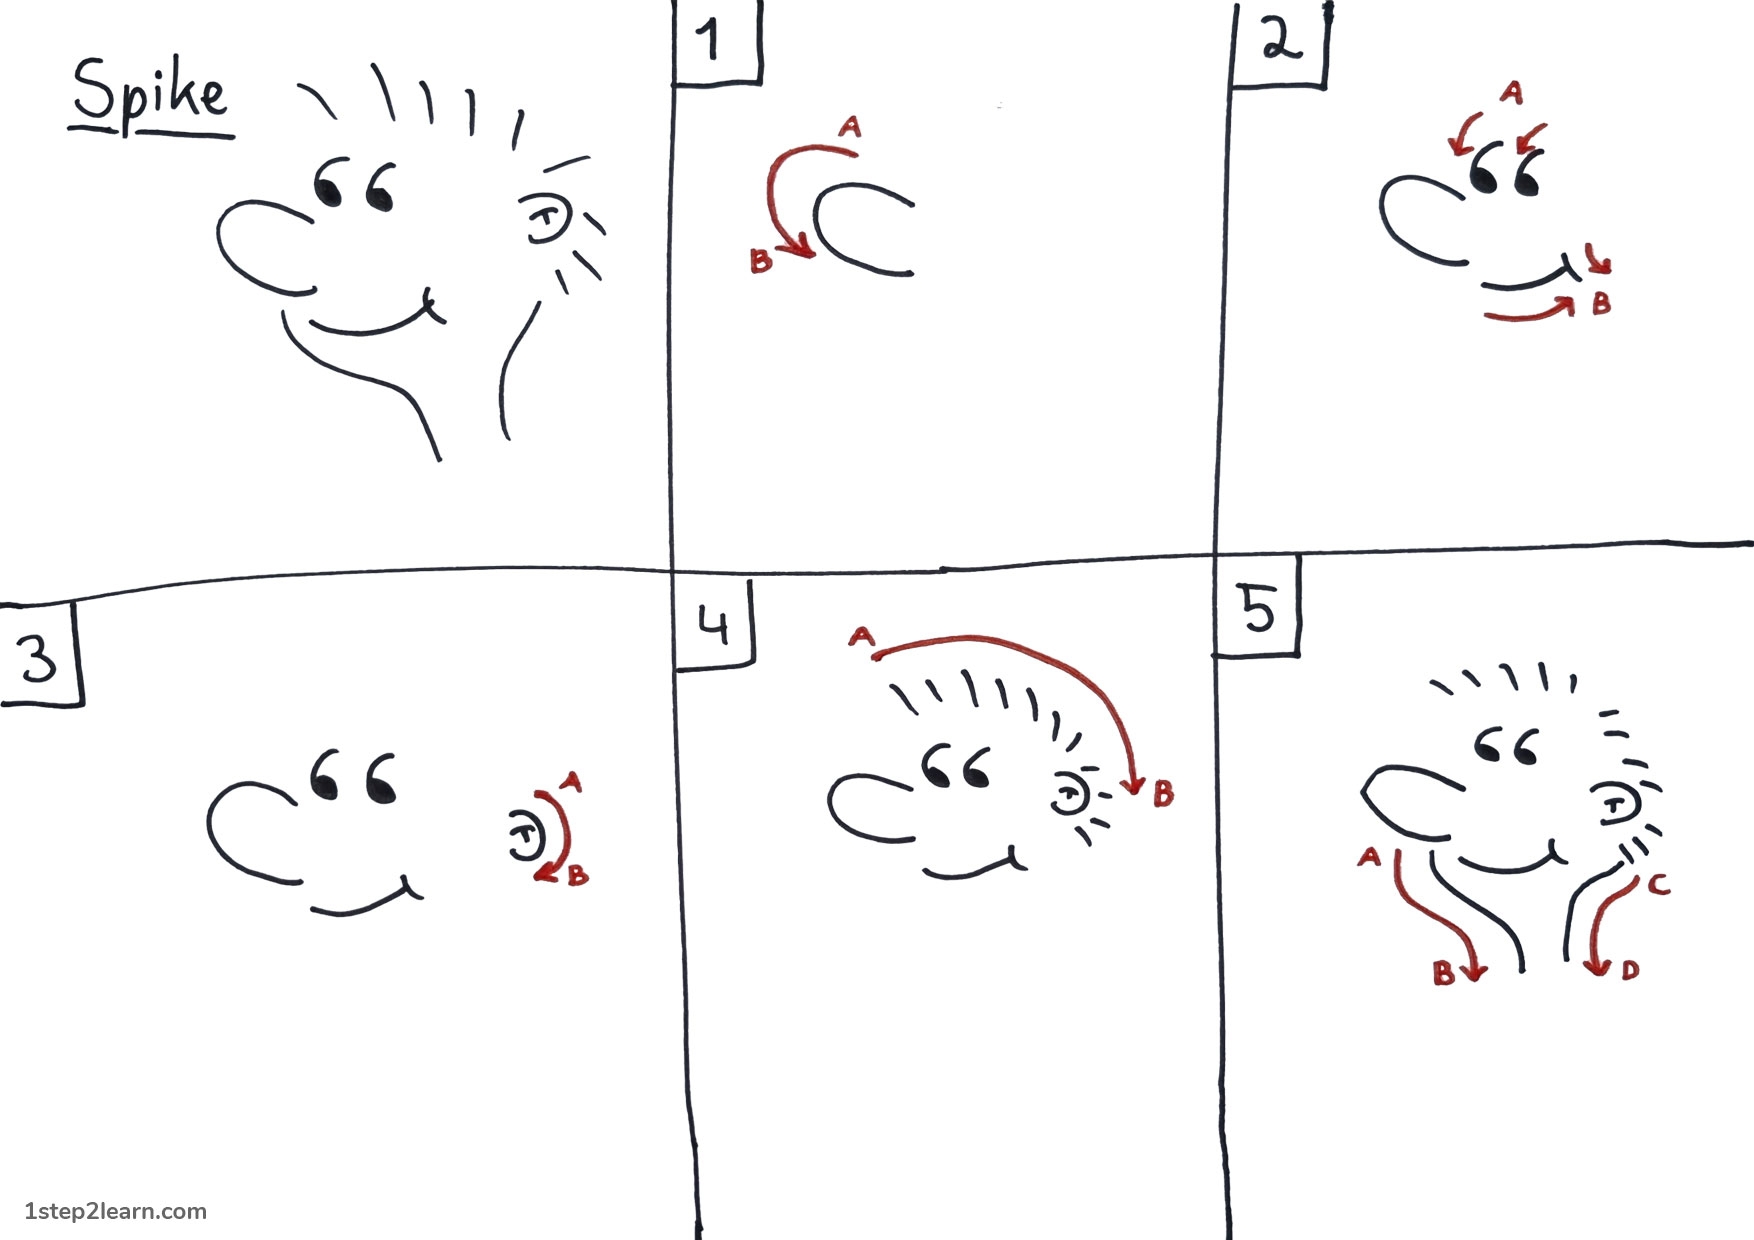
First Exercise: Spike
Prepare to be amazed by our first exercise: drawing the iconic cartoon character, Spike! This exercise is designed to ignite your creativity and show you that you can bring characters to life on paper.
Now, take a blank piece of paper and a pencil, and let's try drawing Spike. Don't worry about making mistakes, as they are a natural part of the learning process. The more you practice, the better you will become.
I highly recommend following along with the steps in the picture. It will give you a better understanding of the process and help you achieve fantastic results.
Why Everyone Can Draw
In his talk, "Why people believe they can't draw - and how to prove they can", Graham Shaw explores the reasons why so many people think they can't draw, and offers a solution to help them overcome their fear of drawing. He believes that everyone has the potential to be a great artist and that drawing is a skill that can be developed with practice.
One of the key components of his talk is an exercise in which he guides the audience through drawing a cartoon character named Spike. This exercise is meant to demonstrate that anyone can draw, regardless of their level of experience. By breaking down the drawing process into simple steps and encouraging everyone to embrace their own unique style and approach, Shaw hopes to show that drawing is accessible to everyone.
Additionally, Shaw teaches a sequence that can be used to draw thousands of different cartoons, starting with a nose, then adding eyes, mouth, and hair. This sequence can be used as a framework to create a wide range of cartoon characters, allowing artists to use their creativity to fill in the details.
One particularly inspiring part of the talk is when Shaw shows how stroke patients who have lost the ability to draw can use the Spike exercise to regain their drawing skills. By breaking the process down into simple steps, stroke patients can rebuild their confidence and begin to draw again. This can be an incredibly empowering experience and can lead to improved mental and emotional well-being.
Overall, Shaw's talk is a great reminder that anyone can learn to draw, no matter their level of experience or perceived ability. With a little practice and persistence, anyone can become a great artist.
I've attached Graham Shaw's video about drawing that we were discussing earlier. It's really insightful and I highly recommend you watch it when you get a chance.
Why is Drawing Important?
Drawing is a powerful tool that allows us to express ourselves, to create and explore new ideas. It can be a fun activity to enjoy, but also serves as a form of communication that can help us record and document our experiences. Drawing has been around for centuries - if we go back in time and visit our prehistoric ancestors, we will find drawings in caves. Drawing has served a purpose all throughout history, from cave paintings to modern-day art.
When you draw from observation, it can help you build up your visual library and improve your ability to see and interpret the world around you. Additionally, drawing is a means of expression that allows you to visualize your thoughts and ideas and present them to the rest of the world. It's a way to put your imagination down on paper, and share it with others.
"Everything you can imagine is real." - Pablo Picasso
However, not everyone invests their time in drawing. Some people may not see the value in it, or may not have the opportunity to explore it. But drawing can be a great way to develop your creativity and imagination, and to learn how to express yourself in new ways. A child's drawing is often seen as the most honest form of a drawing, and Picasso famously said that it took him four years to paint like Raphael, but a lifetime to paint like a child.
Drawing is a powerful tool that can help us express ourselves, communicate our ideas, and explore the world around us. Whether you're an experienced artist or just starting out, drawing can offer a lot of benefits and is a worthwhile pursuit for anyone interested in exploring their creativity.
Muscle Memory
When you're learning to draw, your brain is working hard to create and strengthen neural pathways that connect your motor skills and your visual perception. These pathways help your brain translate what you see into a physical action that produces a mark on the page.
Muscle memory is the process by which your brain creates these pathways. As you practice drawing, your brain is forming new connections and reinforcing old ones between the visual information you're seeing and the motor skills required to create the lines and shapes you're drawing.
Contrary to its name, muscle memory doesn't actually live in the muscles themselves - it's a function of the brain. The muscles themselves don't have memory, but they do become better at performing specific movements with practice. This is because the more you practice a particular movement, the more efficient your brain becomes at sending signals to the muscles to perform that movement.
So when you're drawing, you're essentially building up your brain's ability to translate visual information into motor actions that produce marks on the page. The more you practice, the stronger those neural pathways become, and the easier it becomes for you to draw the things you want to draw.
"The best way to learn to draw is to draw and draw and draw." - Maurice Sendak
So, muscle memory is a key part of learning to draw, and it's a process by which your brain creates and strengthens neural pathways that connect your motor skills and visual perception. The more you practice, the stronger these connections become, and the more efficient your brain becomes at translating what you see into marks on the page.
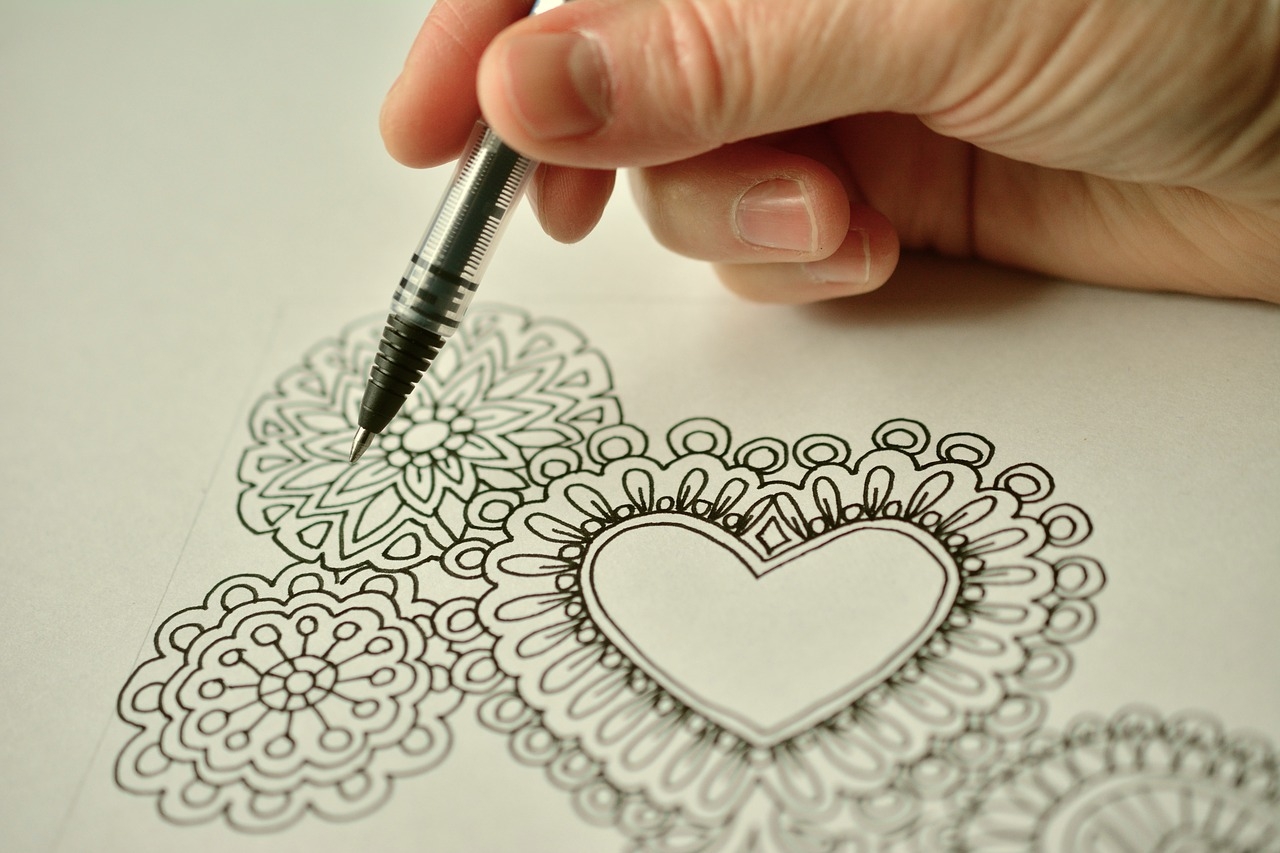
How to Hold a Pencil Correctly
The way you hold your pencil is actually quite important when it comes to drawing. A good grip can help you control the pencil more easily and make more precise marks on the page.
The most common grip is called the tripod grip, which is named for the three fingers that hold the pencil - the thumb, the index finger, and the middle finger. With the tripod grip, you hold the pencil about an inch from the tip, and you use your fingers to control the movement of the pencil.
Another popular grip is called the overhand grip, which is when you hold the pencil above the tip, like you would hold a paintbrush. This grip can be useful for making loose, expressive marks, but it can be more difficult to control than the tripod grip.
There are a few other grips that people sometimes use, like the underhand grip (where you hold the pencil under the tip) or the lateral tripod grip (where you hold the pencil between your index and middle fingers instead of your thumb and middle finger), but these are less common.
It's important to remember that while the tripod grip is generally considered the best grip for drawing, you can change your grip depending on the task you are working on.
For example, if you're doing a lot of shading or filling in large areas, you might find that the overhand grip allows you to make broader, more sweeping strokes. On the other hand, if you're doing detailed line work or sketching, you might want to switch to the tripod grip for better control.
A pencil grip aid can be placed on the pencil to help maintain a proper tripod grip. It is designed to guide your fingers into the correct position and help you practice holding the pencil in the tripod grip.
By using this grip aid, you can train your hand muscles to adapt to the tripod grip and develop muscle memory, which is crucial in learning how to draw. The grip aid can be used for writing and drawing, and is especially useful for beginners who are just starting to learn how to hold a pencil correctly.
Over time, as you practice more and more, you can gradually reduce your reliance on the grip aid and eventually develop a more natural and comfortable grip on your own.
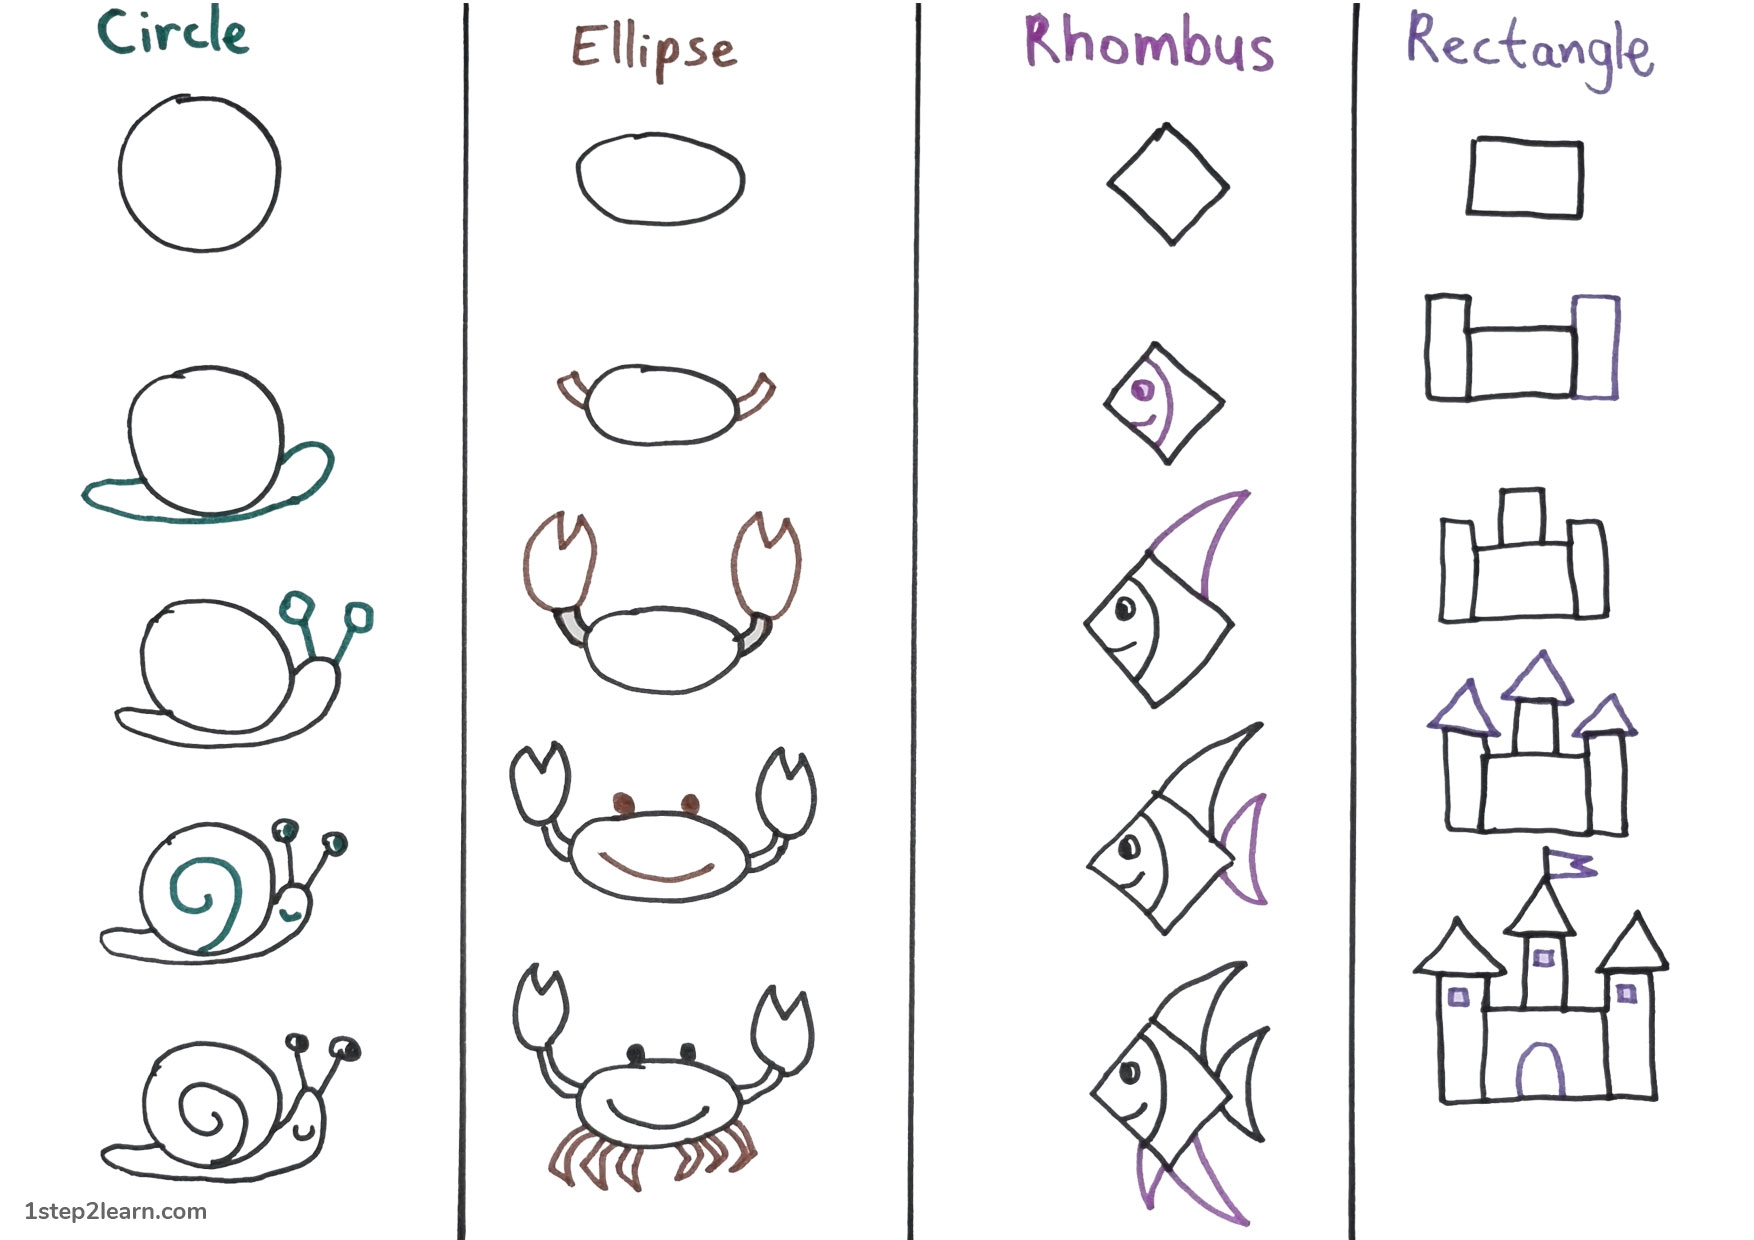
Understanding Basic Shapes
Understanding basic shapes is really important when it comes to drawing, especially if you're just starting out. The idea is to simplify complex objects into easier-to-draw forms. There are several basic shapes that you should know, including circles, squares, rectangles, triangles, and ovals. Once you have these shapes down, you can start to combine them to create more complex objects.
For example, you can use a circle and a rectangle to create a simple drawing of a person. And when it comes to creating the illusion of depth in your drawings, perspective is key. Drawing a cube in perspective, for instance, requires an understanding of how to draw a square in a three-dimensional space.
By mastering these basic shapes and techniques, you'll be able to create more complex and realistic drawings. And as you continue to practice and improve your skills, you can start to explore more advanced topics, such as shading, composition, and color theory. So, start with the basics and keep practicing - you'll be surprised how quickly you'll be able to improve!
Proportions
Proportions are really important when it comes to drawing, because they help ensure that your drawings look realistic and believable. The basic idea behind proportions is that the different parts of an object should be drawn in relation to one another.
For example, if you're drawing a person, you want to make sure that the head is proportional to the body, and that the arms and legs are proportional to one another. One common way to think about proportions is to use the "head method." In this method, you use the size of the head as a unit of measurement, and draw the rest of the body in relation to the head.
In general, a person's head is about one-eighth the height of their entire body. And the body can be divided into other proportional segments, such as the distance from the shoulders to the hips, or the distance from the hips to the feet. By understanding these proportions, you can create more accurate and realistic drawings.
Of course, proportions can vary depending on the style of drawing you're going for. Cartoons, for example, often exaggerate proportions for effect. But even in this case, it's important to have a basic understanding of proportions, so that you can intentionally distort them in a way that looks intentional and not simply poorly drawn.
So, if you're just starting out with drawing, it's a good idea to practice drawing objects and people using proper proportions. As you get more comfortable with this, you can start to experiment with different styles and techniques.
There are several ways to practice proportions in drawing. Here are a few:
-
Using reference images: Find images of people or objects and use them as a reference to practice drawing them with correct proportions.
-
Grid method: Draw a grid on your reference image and on your drawing paper. This will help you to focus on each square of the grid and break down the proportions into smaller, more manageable parts.
-
Drawing from life: Try to draw people or objects from life, either by sitting in front of them or by using a mirror. This will help you to develop your observational skills and improve your ability to accurately capture proportions.
-
Gesture drawing: This is a quick way of capturing the essence of a pose or an object, focusing on the basic shapes and proportions. It helps you to develop your eye-hand coordination and speed up your drawing process.
-
Draw the same subject from different angles: Draw a subject, such as a face or a tree, from different angles to help you understand how proportions change with perspective.
-
Practice drawing from memory: After studying proportions, try to draw something from memory without a reference image. This will help you internalize the concepts and train your visual memory.
Perspective
Perspective is an important concept in drawing that involves creating the illusion of depth and space on a flat piece of paper. It allows you to create the impression of distance, and can really enhance the realism of your drawings.
There are a few different types of perspective, but the most common is one-point perspective. This involves drawing an object or scene as if you were looking straight at it, with a single vanishing point in the distance. To create the illusion of depth, you'll use converging lines that all lead back to that single point.
To practice one-point perspective, you can start by drawing a simple box or cube, and then adding in converging lines to create the illusion of depth. You can also try drawing a street or hallway with buildings or doorways that seem to recede into the distance. The key is to make sure that all the lines converge towards that single vanishing point.
Another type of perspective is two-point perspective, which involves drawing an object or scene as if you were looking at it from an angle. This means that there will be two vanishing points, one on either side of the object. To practice two-point perspective, you can draw a simple house or building, and then add in converging lines that lead towards each of the two vanishing points.
There are also other types of perspective, such as three-point perspective and atmospheric perspective, which involve more complex techniques for creating the illusion of depth and space.
By understanding perspective, you can add a lot of depth and realism to your drawings. It takes practice, but once you get the hang of it, you'll be able to create truly stunning works of art.
Shading
Shading is a fundamental aspect of drawing that can really bring your artwork to life. Essentially, it involves using a range of values from light to dark to create the illusion of depth and dimension on a two-dimensional surface.
To start, it's important to understand the concept of light source. This is where the light is coming from in your drawing and it will determine where the shadows and highlights fall on your subject. Once you have identified your light source, you can start to shade accordingly.
One way to practice shading is to create a value scale, which is a scale of grays ranging from white to black. By using this scale, you can learn to create a range of values and gradually build up your shading skills.
Another helpful tip is to observe real-life objects and how the light falls on them. This can help you understand the different planes of an object and how the light interacts with them.
When shading, it's important to use a range of techniques such as hatching, cross-hatching, and blending to create different textures and effects. Practice these techniques and experiment with different tools such as pencils, charcoal, and markers to see what works best for you.
Remember, shading takes practice and patience, so don't get discouraged if your first attempts don't turn out perfectly. With time and practice, you'll be able to create beautifully shaded drawings that really capture the essence of your subject.
Color theory
Color theory is a fundamental concept in art and design that is essential to understanding how to use color effectively. It's the study of how colors interact with each other and the emotions and moods they can evoke.
The color wheel is the most basic tool for understanding color theory. It's a circular diagram that shows the relationships between primary, secondary, and tertiary colors. The primary colors are red, blue, and yellow, which can be combined to create secondary colors like green, orange, and purple. Tertiary colors are created by mixing a primary and a secondary color.
One of the most important aspects of color theory is understanding color harmonies, which are combinations of colors that work well together. There are several different color harmonies, including complementary, analogous, triadic, and tetradic.
Complementary colors are colors that are opposite each other on the color wheel, like red and green or blue and orange. Analogous colors are colors that are adjacent to each other on the color wheel, like blue and green or yellow and orange. Triadic colors are three colors that are equally spaced apart on the color wheel, like red, yellow, and blue. Tetradic colors are four colors that form two complementary color pairs.
Understanding color theory can help you choose the right colors for your artwork, design projects, or even in everyday life, like choosing the right outfit to wear. It can also help you create the mood and atmosphere you want to convey in your art or design work.
Here are five exercises to practice color theory:
-
Monochromatic study: Choose a single color and create a painting or drawing using only shades and tints of that color. This exercise helps to understand the value and saturation of a single color.
-
Complementary color study: Choose two complementary colors, such as blue and orange, and create a painting or drawing using only those colors. This exercise helps to understand how complementary colors work together and how to create contrast in a piece.
-
Color mixing: Experiment with mixing colors together to create new colors. This can be done with paint, colored pencils, or any other coloring medium. This exercise helps to understand how to create a wide range of colors and how to adjust the tone and hue of a color.
-
Color wheel: Create a color wheel by arranging the primary, secondary, and tertiary colors in a circular format. This exercise helps to understand how colors are related to each other and how they can be combined to create different effects.
-
Color scheme study: Choose a specific color scheme, such as analogous or triadic, and create a painting or drawing using those colors. This exercise helps to understand how different color schemes can create different moods and effects in a piece.
Conclusion
As we come to the end of the course, I hope that I've been able to provide you with helpful information about learning to draw. We've covered a lot of ground, from the importance of drawing as a tool for self-expression and communication, to specific techniques like understanding basic shapes, proportions, perspective, shading, and color theory.
We've also talked about different exercises and methods you can use to practice and improve your skills, including focusing on muscle memory, using different pencil grips, and drawing from observation.
Remember, drawing is a skill that anyone can learn with practice and patience. It's a journey, not a destination, so be sure to enjoy the process and not just the final result. With time and dedication, you'll be amazed at how far you can come. Good luck, and happy drawing!