Host Your Static Website on Firebase for Free

Unlock the secrets of free web hosting! Learn to host your static site on Firebase with a custom domain effortlessly. Dive in now!
Create Firebase Project
Alright, let's dive into the exciting world of setting up your static website on Firebase! First things first, you'll need a Gmail account. If you don't have one, it's a breeze to create. Once you've got that sorted, head over to the Firebase Console. This is your portal to all things Firebase, and it's where the magic happens.
So, diving into Firebase is like setting up your own little corner on the web. First off, head over to the Firebase Console on the web—it's like the control center for all things Firebase.
Once you're there, hit the "Create Project" button. Think of your project as a virtual workspace where all the magic will happen.
Now, naming your project is like giving it a cool nickname. Choose something catchy, and boom, your Firebase project is born! Next up, you'll want to add the Hosting product to your project.
Inside the console, navigate to the Hosting product. That's your golden ticket to getting your website up and running.

Install Firebase CLI
Before we jump into the console wizardry, let's talk about Firebase CLI. CLI stands for Command Line Interface, and it's your trusty sidekick in this web-hosting adventure.
To wield the power of Firebase CLI, you need to have npm (Node Package Manager) installed on your computer. Here's a pro-tip: if you don't have npm yet, consider installing Node.js on your machine. It's like the Swiss Army knife for JavaScript, and it brings npm along for the ride.

Now, you might be thinking, "What's npm, and why do I need it?" Well, npm is a package manager for JavaScript. It helps you install and manage the tools and libraries you'll need for your project. It's the behind-the-scenes hero that makes Firebase CLI work seamlessly.
Here's the scoop: Firebase CLI relies on Node.js and npm to do its thing. Node.js is a JavaScript runtime that lets you execute JavaScript code server-side, and npm is the accompanying package manager. So, installing Node.js is like giving your computer a backstage pass to the world of JavaScript tools.
Firebase Login
First things first, create or locate a root directory for your web app—this is where the magic will happen. Now, open up your terminal and sign in to Google with a simple command:
firebase login
A prompt will appear, asking if you want to allow Firebase to collect reporting information. Politely decline by typing n, and voila, a new tab opens in your browser.
This is where the real connection happens. In the browser tab, link up with your Gmail account. Firebase CLI will request some permissions—don't worry, it's all part of the process. Allow these permissions, and with a triumphant "Login Success" message, you can close the tab and return to your terminal.

Firebase Init and Setup
firebase init

? Are you ready to proceed? Yes
? Which Firebase features do you want to set up for this directory? Press Space to select features...

 ( ) Firestore: ...
 ( ) Functions: ...
>(*) Hosting: Configure files for ...
 ( ) Hosting: Set up GitHub ...

=== Project Setup
...
? Please select an option: (Use arrow keys)
> Use an existing project
  Create a new project
  ...

? Select a default Firebase project for this directory: (Use arrow keys)
> your-project-name

=== Hosting Setup
...
? What do you want to use as your public directory? (public)
? Configure as a single-page app (rewrite all urls to /index.html)? (y/N) n
? Set up automatic builds and deploys with GitHub? (y/N) n

Deploy to Firebase Hosting
Hey, let's talk about the final boss move in the Firebase world—deploying your masterpiece to Firebase Hosting.
So, picture this: all the cool stuff you've crafted—your HTML, CSS, and JS files—just gather them up in a special folder. Think of it like packing your bags for a trip, and this folder is your travel suitcase. By default, Firebase expects this folder to be named 'public'.
Now, here comes the magic moment. Head to your terminal, navigate to your app's home base, and type firebase deploy. It's like hitting the launch button on a rocket ship but way less complicated. Watch as Firebase works its charm, grabbing all your files, and whoosh! Off they go, landing on Firebase Hosting where your website gets its own little spot on the internet stage.
firebase deploy
After the deploy dance is done, you get the golden ticket—your website's new address. It's like getting the keys to your brand new shop. Check it out, your-project-name.web.app. That's where the world can now marvel at your creation.
And the cool part? Whenever you tweak or add stuff to your site, just run firebase deploy again. It's like updating your online masterpiece effortlessly. No coding acrobatics needed—just a simple command.
Add Custom Domain
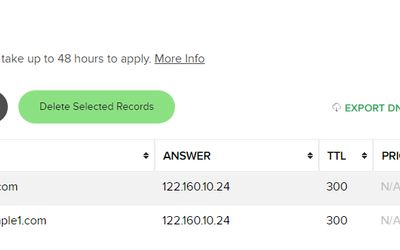
Hey, let's level up your web game—time to add a custom domain to your Firebase project. It's like giving your site a VIP address, you know? So, first things first, Firebase wants to make sure you're the rightful owner of the domain you're claiming. They'll provide you with an IP address, like a secret code, and you'll have to add an A record in your DNS provider. It's like telling the internet police, "Yep, this domain is mine."
| Type | Host | Answer |
|---|---|---|
| A | IP Address from Firebase | |
| CNAME | www | Your web.app domain from Firebase |
Here's the lowdown: in your DNS provider, add another record, this time a CNAME record. It's like putting up a sign saying, "If they come through www, take them straight to the main door at yourdomain.com." This ensures a consistent experience for your visitors, no matter how they type in your web address.

Once you set up your custom domain, Firebase takes care of SSL, the techy shield that makes your website super secure. Just a heads up, it takes a bit of time, so be patient.
Keep an eye on the SSL status in the Firebase Console; if you encounter "Your connection is not private," no worries—it's just the SSL doing its setup dance.
Usage and Billing
let's chat about the nitty-gritty of using Firebase and what's up with the billing scene. So, here's the lowdown – Firebase is this awesome tool that lets you build and host web applications with a breeze. Now, when it comes to billing, it's not like a flat fee; it's more about what you use. It's kind of like paying for what you eat at a buffet – if you grab more, you pay a bit more.
Now, Firebase billing has two main players: 'Downloads' and 'Storage'. Think of 'Downloads' as the guests at your website's party – every time someone visits and grabs something like an image or a file, that counts as a download. Then there's 'Storage', which is like renting space for your website's stuff. So, if you're uploading images, videos, or any kind of data, that falls into the storage category.
But here's the cool part, especially if you're rolling with the free Spark plan. You get this generous allowance of 10 gigabytes for both downloads and storage each month. It's like having this monthly budget – you can use up to 10 gigs worth of downloads, meaning visitors can enjoy your site, and you can store up to 10 gigs of content without spending a dime.

And don't worry too much – Firebase keeps you in the loop. In your Firebase Console, you can track your usage and see how close you are to your limits. It's like having a fuel gauge for your website – you glance at it, and you know if you're cruising smoothly or need to ease off the accelerator a bit.
Logout
Oh, and here's the cherry on top – once you're done with Firebase in your terminal, it's like checking out of a virtual hotel. Just type firebase logout and boom, consider yourself officially logged out.
Conclusion
That's the scoop on Firebase – your go-to for web adventures. From setting up projects to hosting, and even understanding the billing dance, you're all set. It's like having a tech-savvy sidekick. Now, armed with this knowledge, go ahead, bring your web dreams to life, and let Firebase be the superhero in your coding tale.


