Hosting Multiple Websites with Nginx on a Single Linux Server
How to master hosting multiple websites on your Linux server with Nginx. Discover seamless solutions for effortless and efficient web management.
Accessing the Server
Use cmd or your preferred SSH client to connect to the server:
ssh user@your_server_ip
When typing the password, you do not see letters or asterisks; no worries.
DNS Configuration for Your Domains
you need to make sure that your domain names are correctly mapped to your server's IP address. This involves configuring the Domain Name System (DNS) settings with your domain provider.
-
Login to your domain provider's website.
-
Locate DNS management or name servers settings.
-
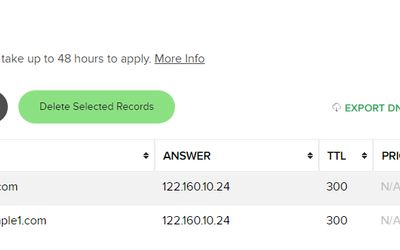
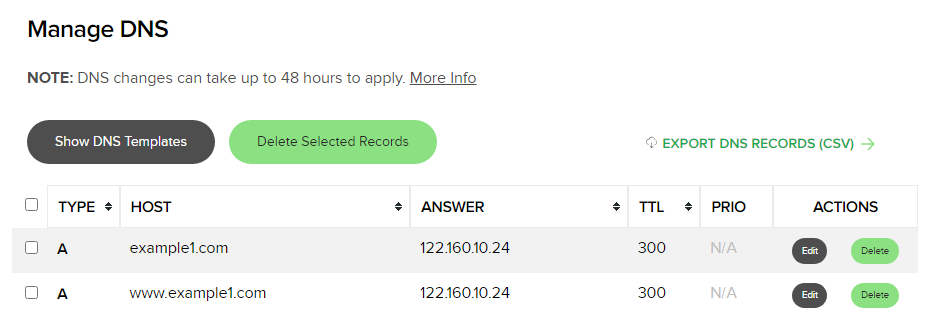
Create
Arecords.
Example:
- example1.com
Arecord: your_server_IP
Install Nginx
Update the package list and install Nginx:
sudo apt update
sudo apt install nginx
To check if Nginx is installed on your Ubuntu server, you can use the following command:
nginx -v
# nginx version: nginx/1.18.0 (Ubuntu)
Start and Enable Nginx
Start the Nginx service and enable it to start on boot:
sudo service nginx start
sudo systemctl enable nginx
Add Domain to Nginx
Replace /var/www/yourdomain.com with the path where you want to store the website files:
# Create a root directory for the domain
sudo mkdir /var/www/yourdomain.com

# Set the correct permissions for the new directory
sudo chown -R www-data:www-data /var/www/yourdomain.com

# Create a sample HTML file for testing
echo '<html><body><h1>Welcome to yourdomain.com!</h1></body></html>' | sudo tee /var/www/yourdomain.com/index.html

# View the folders and files
cd /var/www/
ls
cd yourdomain/
ls

# Create an Nginx configuration file for the new domain
sudo nano /etc/nginx/sites-available/yourdomain.com
The
nanocommand is a text editor in Unix-like operating systems.
Paste the following configuration, adjusting the domain name and paths:
server {
    listen 80;
    server_name yourdomain.com www.yourdomain.com;

    root /var/www/yourdomain.com;
    index index.html;

    location / {
        try_files $uri $uri/ =404;
    }
}
Press Ctrl + O (Write Out) to save the file, and then press Ctrl + X to exit the text editor.
Save the file and create a symbolic link to enable the site:
sudo ln -s /etc/nginx/sites-available/yourdomain.com /etc/nginx/sites-enabled/
Test Nginx Configuration:
sudo nginx -t
# nginx: the configuration file /etc/nginx/nginx.conf syntax is ok
# nginx: configuration file /etc/nginx/nginx.conf test is successful
Restart Nginx to apply the changes:
sudo service nginx restart
Make sure the DNS records for yourdomain.com is point to your server's IP address.
Test in the Browser: Visit http://yourdomain.com and http://www.yourdomain.com in your browser to see the welcome message.

SSL Certificate - HTTPS
Use Let's Encrypt to obtain a free SSL certificate. Many hosting providers and platforms have integrated Let's Encrypt support.
sudo apt update

# Install Certbot, the official Let's Encrypt client
sudo apt install certbot

# Install the Certbot Nginx plugin
sudo apt install python3-certbot-nginx

# Run Certbot with Nginx Plugin
sudo certbot --nginx -d yourdomain.com -d www.yourdomain.com

# Test the Nginx configuration
sudo nginx -t

# Restart Nginx to apply the changes
sudo service nginx restart
The configuration file after the change:
server {
    server_name yourdomain.com www.yourdomain.com;

    root /var/www/yourdomain.com;
    index index.html;

    location / {
        try_files $uri $uri/ =404;
    }

    listen 443 ssl; # managed by Certbot
    ssl_certificate /etc/letsencrypt/live/yourdomain.com/fullchain.pem; # managed by Certbot
    ssl_certificate_key /etc/letsencrypt/live/yourdomain.com/privkey.pem; # managed by Certbot
    include /etc/letsencrypt/options-ssl-nginx.conf; # managed by Certbot
    ssl_dhparam /etc/letsencrypt/ssl-dhparams.pem; # managed by Certbot
}

server {
    if ($host = www.yourdomain.com) {
        return 301 https://$host$request_uri;
    } # managed by Certbot


    if ($host = yourdomain.com) {
        return 301 https://$host$request_uri;
    } # managed by Certbot


    listen 80;
    server_name yourdomain.com www.yourdomain.com;
    return 404; # managed by Certbot
}
Nginx Config for www to non-www Redirection
Replace yourdomain.com with the actual domain of your website.
# Edit the Nginx configuration file
sudo nano /etc/nginx/sites-available/yourdomain.com
server {
    listen 80;
    server_name www.yourdomain.com yourdomain.com;
    return 301 https://yourdomain.com$request_uri;
}

server {
    listen 443 ssl;
    server_name www.yourdomain.com;

    ssl_certificate /etc/letsencrypt/live/yourdomain.com/fullchain.pem;
    ssl_certificate_key /etc/letsencrypt/live/yourdomain.com/privkey.pem;
    include /etc/letsencrypt/options-ssl-nginx.conf; # managed by Certbot
    ssl_dhparam /etc/letsencrypt/ssl-dhparams.pem; # managed by Certbot

    return 301 https://yourdomain.com$request_uri;
}

server {
    listen 443 ssl;
    server_name yourdomain.com;

    root /var/www/yourdomain.com;
    index index.html;

    location / {
        try_files $uri $uri/ =404;
    }

    error_page 404 /404.html;
    location = /404.html {
        internal;
    }

    ssl_certificate /etc/letsencrypt/live/yourdomain.com/fullchain.pem;
    ssl_certificate_key /etc/letsencrypt/live/yourdomain.com/privkey.pem;
    include /etc/letsencrypt/options-ssl-nginx.conf; # managed by Certbot
    ssl_dhparam /etc/letsencrypt/ssl-dhparams.pem; # managed by Certbot
}
Press Ctrl + O followed by Enter to save the file.
Press Ctrl + X to exit.
# Test the Nginx configuration
sudo nginx -t
# nginx: the configuration file /etc/nginx/nginx.conf syntax is ok
# nginx: configuration file /etc/nginx/nginx.conf test is successful
After making these changes, restart Nginx:
sudo service nginx restart
# OR
sudo systemctl restart nginx
Ensure testing for all scenarios:
http://yourdomain.comshould redirect tohttps://yourdomain.comhttp://www.yourdomain.comshould redirect tohttps://yourdomain.comhttps://www.yourdomain.comshould redirect tohttps://yourdomain.comhttps://yourdomain.comshould remain unchanged and stay onhttps://yourdomain.com
In this configuration:
- The first server block (port 80) handles the redirection from
http://yourdomain.comtohttps://yourdomain.com. - The second server block (port 443) with server_name
www.yourdomain.comexplicitly redirects tohttps://yourdomain.com. - The third server block (port 443) with server_name
yourdomain.comserves the content forhttps://yourdomain.com.
Setting Up Nginx with Node.js and PM2
Let’s get your Node.js Express app running with PM2 and configure Nginx to handle everything. Here’s the step-by-step process:
-
Connect to Your Server:
ssh user@SERVER_IP -
Navigate to Your App Directory:
cd /var/www/yourdomain.com/ -
Install PM2 globally (if not already installed):
sudo npm install -g pm2 -
Start Your App with PM2:
pm2 start ./server.js --name yourdomain.comserver.js:const express = require('express'); const path = require('path'); const fs = require('fs'); const app = express(); // Serve static files from the 'public' directory app.use(express.static(path.join(__dirname, 'public'))); // Dynamic wildcard route app.get('/*', (req, res) => { const requestedPath = req.params[0]; const filePath = path.join(__dirname, 'public', requestedPath, 'index.html'); // Check if the file exists, and if so, serve it fs.access(filePath, fs.constants.F_OK, (err) => { if (err) { // File not found, serve 404 page res.status(404).sendFile(path.join(__dirname, 'public', '404.html')); } else { // File found, serve it res.sendFile(filePath); } }); }); // Start the server const PORT = 3003; app.listen(PORT, () => { console.log(`Server is running at http://localhost:${PORT}`); }); -
Check PM2 Processes:
pm2 list
Now, let’s set up Nginx:
-
Edit Nginx Configuration:
sudo nano /etc/nginx/sites-available/yourdomain.com -
Nginx Configuration:
server { listen 80; server_name www.yourdomain.com yourdomain.com; return 301 https://yourdomain.com$request_uri; } server { listen 443 ssl; server_name www.yourdomain.com; ssl_certificate /etc/letsencrypt/live/yourdomain.com/fullchain.pem; ssl_certificate_key /etc/letsencrypt/live/yourdomain.com/privkey.pem; include /etc/letsencrypt/options-ssl-nginx.conf; # managed by Certbot ssl_dhparam /etc/letsencrypt/ssl-dhparams.pem; # managed by Certbot return 301 https://yourdomain.com$request_uri; } server { listen 443 ssl; server_name yourdomain.com; root /var/www/yourdomain.com; location / { proxy_pass http://localhost:3003; proxy_http_version 1.1; proxy_set_header Upgrade $http_upgrade; proxy_set_header Connection 'upgrade'; proxy_set_header Host $host; proxy_cache_bypass $http_upgrade; } ssl_certificate /etc/letsencrypt/live/yourdomain.com/fullchain.pem; ssl_certificate_key /etc/letsencrypt/live/yourdomain.com/privkey.pem; include /etc/letsencrypt/options-ssl-nginx.conf; # managed by Certbot ssl_dhparam /etc/letsencrypt/ssl-dhparams.pem; # managed by Certbot }- The first block redirects all HTTP traffic to HTTPS.
- The second block handles HTTPS for
www.yourdomain.comand redirects toyourdomain.com. - The third block serves
yourdomain.com, proxies requests to your Node.js app on port3003, and includes SSL settings.
-
Test Nginx Configuration:
sudo nginx -t -
Restart Nginx:
sudo service nginx restart
# OR
sudo systemctl restart nginx
And that’s it! Your Node.js app should now be running smoothly with PM2 and Nginx handling the traffic with SSL.
Conclusion
Hosting multiple websites on a Linux server with Nginx can be a seamless and efficient process, providing a robust platform for web management. Here's a summary of the key steps covered in this guide:
-
DNS Configuration for Your Domains.
-
Install Nginx.
-
Start and enable Nginx.
-
Add domain to Nginx.
-
SSL certificate - HTTPS.
-
Nginx config for www to non-www redirection.
References
Related Articles