How to Label Images for Object Detection Using LabelImg
Streamline your manual image labeling process for object detection with LabelImg. Learn how to use the tool effectively and save time with tips and tricks.
Introduction
To label images for object detection projects, we'll use the LabelImg tool. First, I'll let you know where the software is installed and how to open it. Then, we'll dive deep into the labeling work.
The software should be in the following folder structure. This means that the software should be organized in a specific way, with certain files and folders in specific locations within the main software directory.
TensorFlow/
├─ addons/
│  └─ labelImg/
Having a well-organized folder structure is important for keeping track of your files and making it easier to find what you're looking for. It can also make it easier for others to understand your project and collaborate with you, if that's something you're interested in.
Installation
If you have not installed the software yet, I recommend that you read the following article. The article has detailed instructions on how to install the software, so you can get it up and running on your computer in no time.
How to Install LabelImg on Windows
Following the instructions in the article will ensure that the software is installed correctly and that you have all of the necessary components and dependencies in place. This will help to minimize any potential issues and ensure that you can start using the software as soon as possible.
Open LabelImg
Once you have installed the software, you can open it by running the labelImg.py file in the command prompt (cmd) or terminal.
cd C:/TensorFlow/addons/labelImg
`python labelImg.py`
You must keep the command prompt open when using LabelImg.
Open images
I usually put all the images in a folder and then load the folder in LabelImg. This makes it easy to label all the images in a batch, rather than loading each image one at a time.
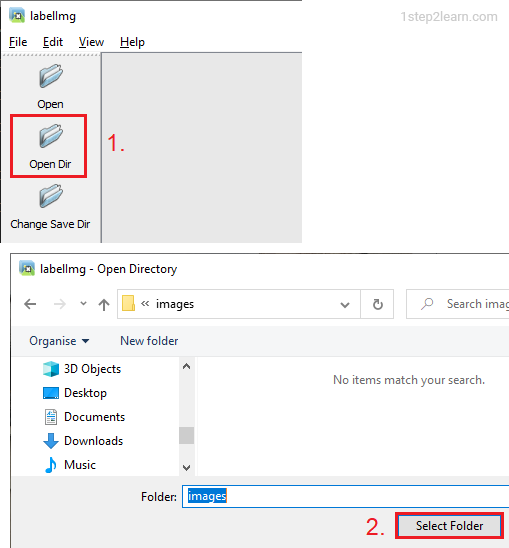
One of the advantages of loading the images in a folder is that the file names appear in the side panel of LabelImg. This makes it easy to keep track of which images you have labeled and which ones you still need to work on.
Additionally, you can navigate between the images using half of the keyboard, which can speed up the labeling process and make it even more efficient.
Draw a new box
Creating a new box is an important step in labeling your images for object detection. This is because the boxes are what define the objects you want to detect in your images.
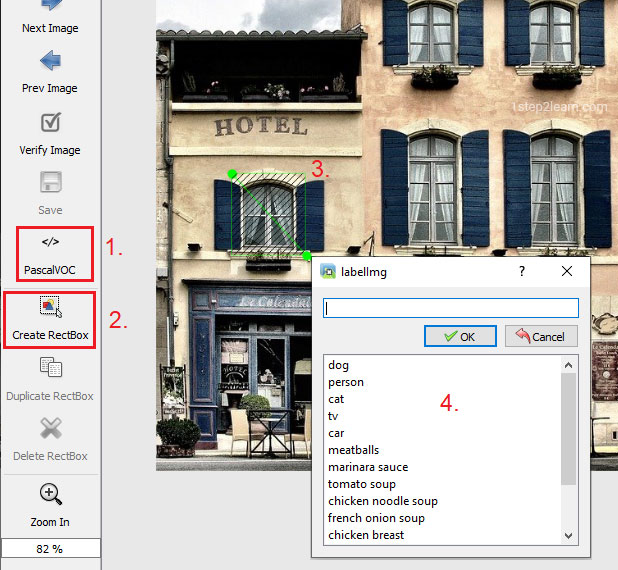
So, let me explain how to create a new box. When you start a new project in LabelImg, you'll be prompted to choose a save format. There are several options to choose from, but in this case, we'll choose PascalVOC.Then, you'll select the "Create RectBox" tool, and then you'll use your mouse to click and drag a box around the object you want to label. You can adjust the size and position of the box as needed to ensure that it covers the object completely.
Once you have created the box, you'll need to label the object by entering the name in the field provided. You can also adjust the class label if needed, and specify any additional attributes that are relevant for your project.
PascalVOC is a well-established and widely used format for object detection annotations, and it's a good choice if you're new to the field. By choosing this format, you'll be able to save your annotations in a way that is compatible with many existing object detection frameworks and models such as TensorFlow.
Step 1: select your 'save format'.
Step 2: Click on 'Create RectBox'.
Step 3: draw a box (RectBox).
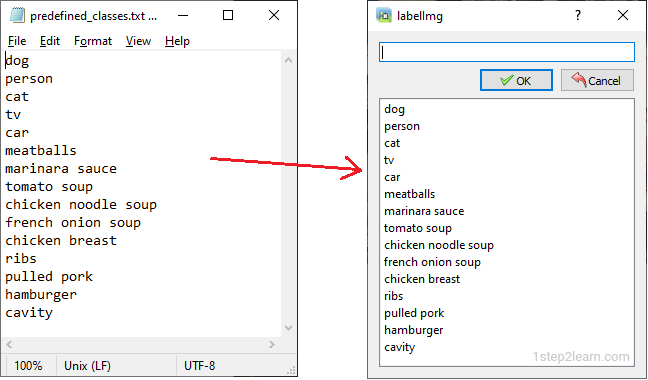
Step 4: Select class (label) from the list (predefined_classes.txt).
Predefined classes .txt file
The "predefined_classes.txt" file contains a list of classes that can be used to train your machine learning model. This file is essentially a pre-defined list of object classes, and it allows you to quickly label objects in your images without having to manually enter the class name each time.
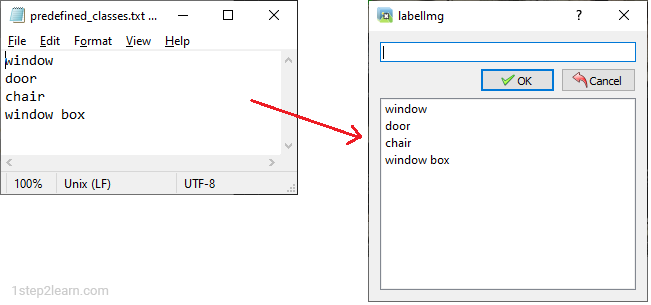
To use the "predefined_classes.txt" file, simply edit it to include the classes (or labels) that you want to train your model to detect. For example, if you're working on an object detection project for cars, you might have a list of classes that includes "sedan," "SUV," "truck," and so on.
Just to clarify, you can find the "predefined_classes.txt" file in the "data" folder of your LabelImg installation.
TensorFlow/
├─ addons/
│  └─ labelImg/
│  │  └─ data/
│  │  │  └─ predefined_classes.txt
The "data" folder is where LabelImg stores various data and configuration files, including the "predefined_classes.txt" file. So, if you need to access this file and edit it to include your desired classes, simply navigate to the "data" folder and open the "predefined_classes.txt" file with a text editor.
Make sure to save a separate "predefined_classes.txt" file for each project you work on.
By having a separate "predefined_classes.txt" file for each project, you'll be able to keep track of the unique set of classes that you used for each project. This can be especially useful if you're working on multiple object detection projects simultaneously, as it will help you to avoid using conflicting or overlapping classes between projects.
It's important to note that if you make changes to the "predefined_classes.txt" file, you will need to reopen LabelImg for the changes to take effect.
This means that if you add, remove, or modify any classes in the "predefined_classes.txt" file, you will need to close LabelImg and then reopen it for the changes to be reflected in the software.
This is because LabelImg loads the classes from the "predefined_classes.txt" file only when the software is first opened, and it does not dynamically update the classes as you make changes to the file.
LabelImg Shortcuts
LabelImg provides several keyboard shortcuts to help you work more efficiently while labeling your images. Here are a few of the most commonly used shortcuts:
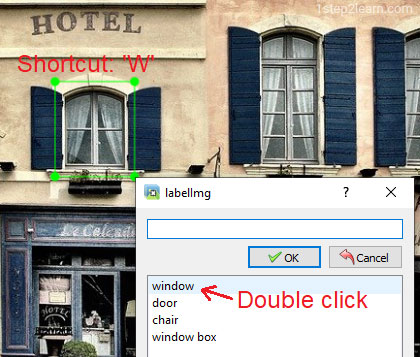
- Create RectBox: Press the 'W' key to quickly create a new bounding box.
- Zoom In: Use the 'Ctrl' + '+' keys to zoom in on the image you're labeling.
- Zoom Out: Use the 'Ctrl' + '-' keys to zoom out of the image you're labeling.
- Save (as xml): Use the 'Ctrl' + 'S' keys to save your labeled image and its annotations in xml format.
- Next Image: Press the 'D' key to move to the next image in the list of files (this shortcut is only available when the "File List" is not empty).
- Prev Image: Press the 'A' key to move to the previous image in the list of files.
- Delete RectBox: Use the 'Delete' key to remove a bounding box from the image.
- Edit Label: Use the 'Ctrl' + 'E' keys to edit the label of a bounding box.
By using these keyboard shortcuts, you can save time and make the labeling process more efficient.
Tips and tricks
Some tips to speed up the process:
-
Use 'Open Dir' instead of 'Open': When opening your images, it's faster to select the entire folder using 'Open Dir' instead of selecting each image individually using 'Open'.
-
Use shortcuts: As mentioned earlier, LabelImg has several keyboard shortcuts that can help you work more efficiently. Make sure to familiarize yourself with these shortcuts and use them often.
-
Define your own 'predefined_classes.txt': This file contains a list of classes to train your ML model. By creating your own predefined classes list, you can ensure that you have the correct labels for your project from the start.
-
Avoid adding new labels while labeling: It's best to have all your labels and classes defined in advance, before you start the labeling process. This will save you time and minimize the risk of errors.
-
Start labeling on a few pictures and train your model: Before you start labeling all of your images, it's a good idea to label a few images and train your model. This will help you identify any issues or mistakes early on and avoid wasting time later.
-
Don't be too lazy to zoom: When labeling, it's important to zoom in on the images to ensure that you're labeling the objects accurately.
-
Mark the whole object and give some space in the margins: When drawing the bounding boxes, make sure to include the entire object and give it a little space in the margins. This will help ensure that your model is able to identify the object more accurately.
-
Double-click on class name to select it: Instead of manually typing in the class name for each bounding box, you can double-click on the class name in the list to quickly select it.
-
Label the objects in an orderly manner, so that you don't have to constantly switch between different labels.
-
Take breaks when needed to avoid fatigue and ensure the labeling remains accurate.
-
Consider labeling with a partner to divide the work and increase efficiency.
-
Label a random sample of images first, to fine-tune the labels and make sure they meet the requirements of your project before labeling the entire dataset.
Save as xml
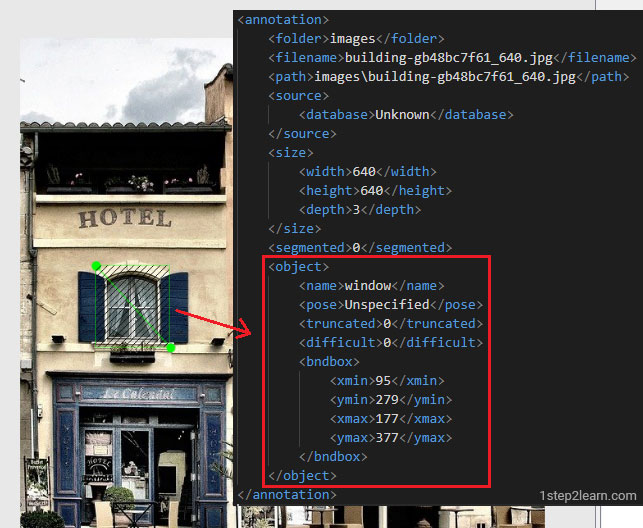
When you press the 'Ctrl' + 'S' shortcut or select "Save" from the "File" menu, LabelImg will generate an XML file that contains the annotations for the image you are labeling. This file will be saved in the same folder as the original image, with the same name as the image, but with a '.xml' extension.
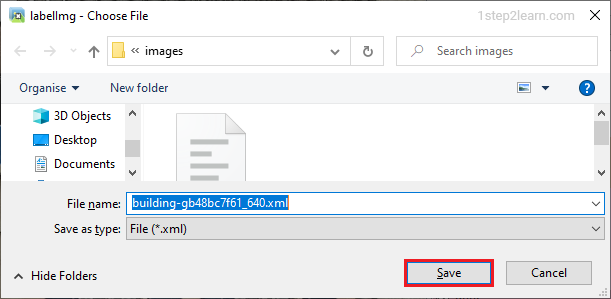
For example, if your image is named 'building.jpg', the annotation file will be named 'building.xml'. It's important to save your annotations regularly so that you don't lose any work in case of a power outage or unexpected interruption.
Result
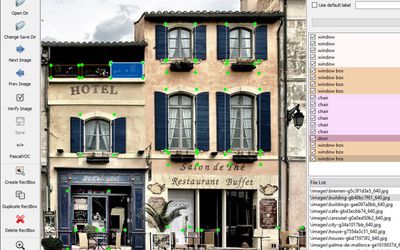
This screenshot depicts the LabelImg software window with a sample image of a building.
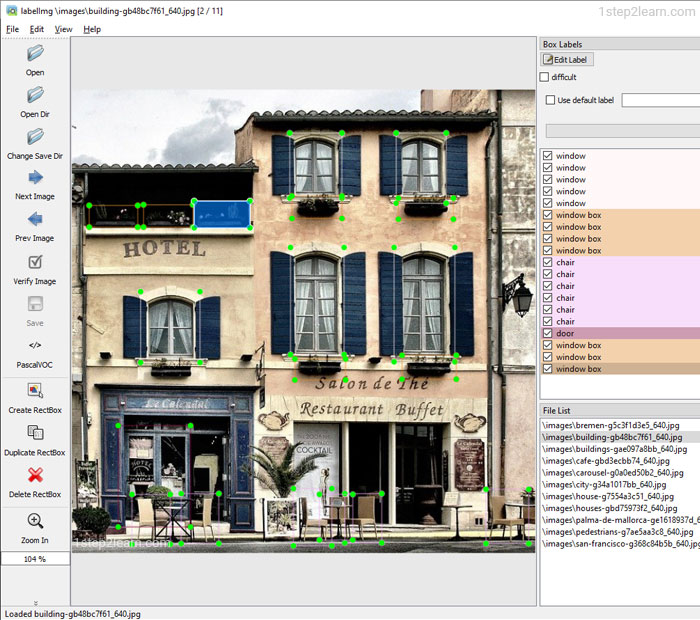
The building features several windows, chairs, and window-boxes. The image has been labeled using the LabelImg tool, with bounding boxes drawn around each object and the object class, such as "window", "chair", or "window box", labeled within each bounding box.
The labels and bounding boxes are displayed in the software's main window, along with the image, and are also saved in an XML file for use in object detection projects.
The screenshot demonstrates how LabelImg can be used to efficiently label images for object detection tasks, with the labeled objects clearly visible in the software window.
References
Related Articles