Deploy Netlify Serverless Functions with Node.js and GitHub

Serverless Functions Introduction
Are you looking to create a serverless application with Node.js and deploy it on the cloud? If so, you're in the right place!
In this guide, I will walk you through the steps to create a Node.js project, upload it to GitHub, and link it to Netlify for easy deployment (CI/CD). Additionally, I will explain how to get a URL endpoint for your API using Netlify Functions.
I also cover how to create a private GitHub repository and how to create a basic Node.js app.
By learning these skills, you'll be well on your way to building robust web applications that can handle a variety of tasks and functions.
"Code less, do more."
And with Netlify's free usage for serverless functions, you can easily get started with creating and deploying your own functions without needing a credit card or worrying about usage costs.
What is Serverless Functions?
Serverless functions, also known as function-as-a-service (FaaS), are a cloud computing model that allows developers to write and deploy code without worrying about the underlying infrastructure.
In this model, the cloud provider manages the infrastructure, automatically scaling the resources up or down as needed, and the developer only needs to write the code for the function.
When a function is called, the provider runs the code, and the results are returned to the caller. This approach is useful for building scalable and highly available applications that can respond quickly to changing workloads.
Netlify Serverless Functions and their Relationship with AWS Lambda
Did you know that Netlify uses AWS Lambda to power its serverless functions? That's right! When you deploy a serverless function to Netlify, it is actually deployed as an AWS Lambda function behind the scenes. This means that Netlify abstracts away the complexity of setting up and managing an AWS account and configuring the Lambda function, making it easy to build and deploy serverless functions without worrying about the underlying infrastructure.
By using AWS Lambda under the hood, Netlify provides a powerful and scalable serverless architecture that is highly reliable and can handle millions of requests per day. This allows developers to focus on building their applications and delivering value to their users, rather than spending time on server administration and management.
Netlify provides free functions usage (125k per site / month) with no credit card needed.
One shortcoming in my opinion with Netlify's service is their automatic upgrade from the free plan to a paid plan without seeking consent. It can be frustrating to receive emails notifying that your site has been upgraded to a higher level and requesting a valid credit card for payment, with the possibility of site suspension after 30 days. This kind of experience can be disappointing for users.
Node.js App
Before we dive into creating serverless functions with Node.js, Netlify, and GitHub, there are a few things we need to set up first. Make sure you have Visual Studio Code and Node.js installed on your computer. If you don't have them installed, you can download and install them from their official websites:
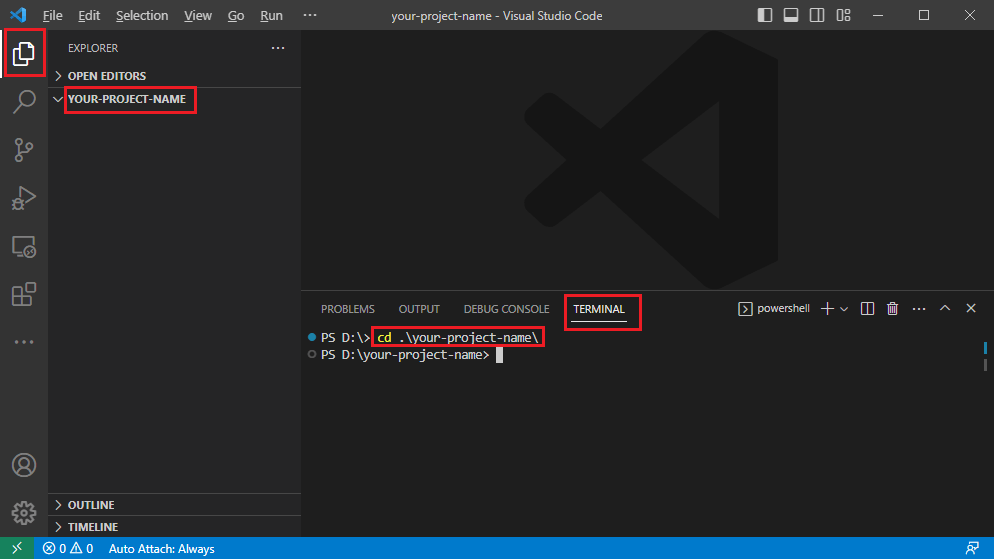
After you've installed Node.js on your computer, you'll need to create a new folder for your project, let's call it your-project-name. Once you've created your new folder, you should navigate to it using the cd command from your terminal.
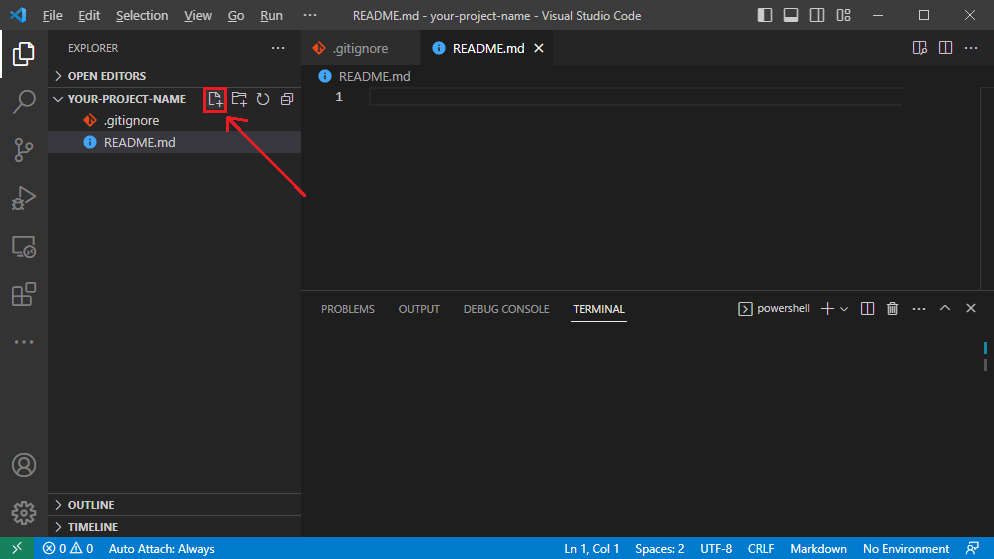
Now, at the root of your project, you'll need to create a .gitignore file to ignore certain files when you commit changes to your Git repository. And, you should create a README.md file to describe your project and its purpose.
Later on in the tutorial, I will explain how to fill in the code for the files and folders we've just created, so don't worry if you're not sure what to put in them yet.
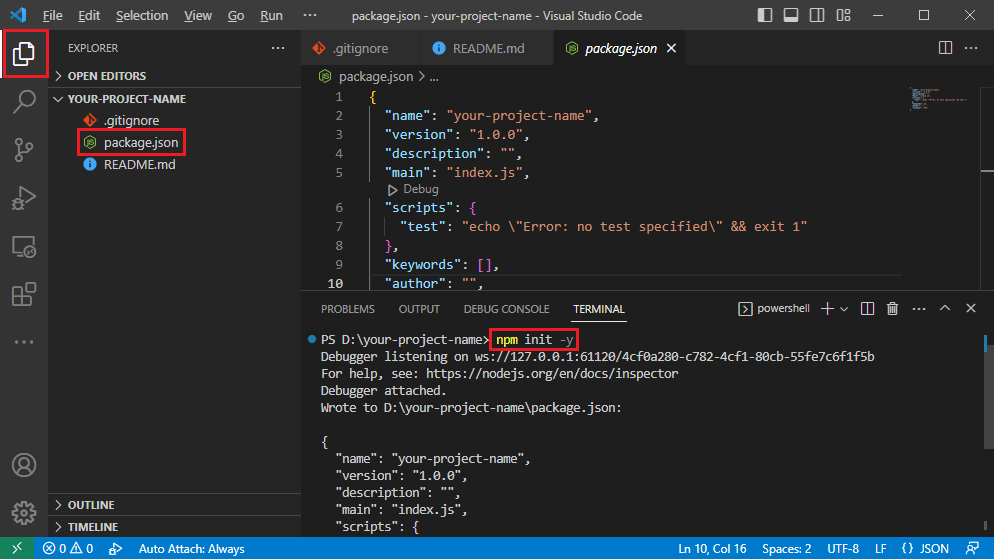
When you create a new Node.js project, you need to create a 'package.json' file to manage your project dependencies and metadata. The 'npm init' command is used to create this file, but it requires you to answer a series of questions about your project, such as the project name, description, author, version, and so on.
The 'npm init -y' command skips the interactive process of creating a new package.json file and uses the default values for all the questions, creating a package.json file with the bare minimum configuration needed to get started with your project.
Using 'npm init -y' can save you a lot of time when you're starting a new project, especially if you don't need to customize the package.json file much at the beginning. However, it's still recommended to review and update the 'package.json' file as needed once it's created.
npm init -y
.gitignore File
The .gitignore file is an important part of any Git project.
It allows you to specify files and directories that should be ignored by Git and not included in your repository, without cluttering it up with unnecessary files or risking including sensitive information that should not be shared.
When you create a new project, it's a good idea to create a .gitignore file at the root of your project before you link it to Git.
This will ensure that any files or directories that should not be included in your repository are ignored from the very beginning.
For example, if you're working on a Node.js project, you might want to include the following lines in your .gitignore file:
# Contains all the installed Node.js dependencies for your project
node_modules/

# Contains the built, compiled or bundled version of your code that is ready to be deployed. Since these files can be generated locally or in your CI/CD pipeline, it is often unnecessary to keep them under version control.
build/
dist/

# This file contains sensitive environment variables for your application, such as database credentials, API keys, or other secrets. It is important to exclude this file from version control to prevent accidental exposure of these secrets.
.env

# This directory contains test coverage reports generated by testing tools like Jest. Since these reports can be regenerated locally or in your CI/CD pipeline, they can be excluded from version control.
coverage/

# These files are created by the macOS or Windows operating system respectively, and contain metadata about files and folders.
.DS_Store
Thumbs.db
README.md File
The 'README.md' file is an essential part of many software projects, providing a high-level overview of the project and its contents. It's written in Markdown, a lightweight markup language that allows you to format text using plain text characters.
It's usually the first file that developers see when they open a project in a code editor or on a code sharing platform like GitHub. The file serves as documentation, explaining what the project is, how it works, and how to use it.
It's essential to create a well-written 'README.md' file for your project, as it helps potential contributors and users to understand your project's purpose, features, and functionality.
A good 'README.md' file should include an introduction to the project, installation and usage instructions, a description of the project's features, and any other relevant information. You can also add badges, links, and images to make the file more visually appealing and informative.
In a serverless Node.js project like the one we're working on, the 'README.md' file should provide a brief overview of the project's architecture, including how it works with Netlify's serverless functions. It should also include information on how to deploy the project to Netlify and how to use its serverless functions.
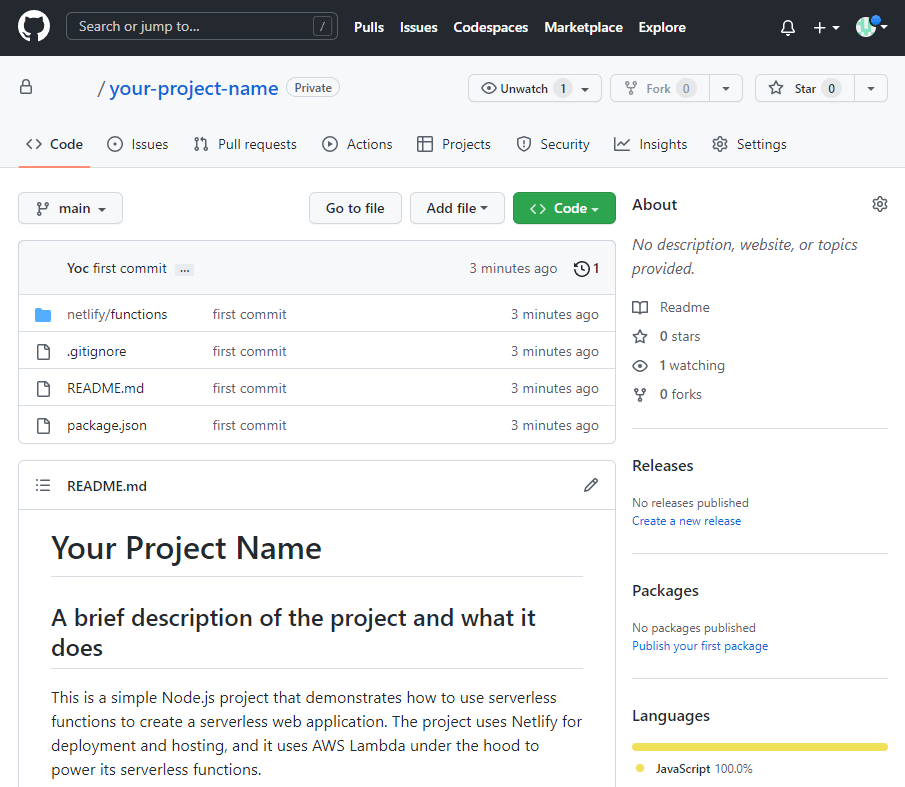
Here's an example README.md file for a Node.js project using serverless functions
# Your Project Name

## A brief description of the project and what it does
This is a simple Node.js project that demonstrates how to use serverless functions to create a serverless web application. The project uses Netlify for deployment and hosting, and it uses AWS Lambda under the hood to power its serverless functions.

## Getting Started
Instructions for installing and running the project.

## Structure
Information about the project's structure and organization.

## Examples
Examples of how to use the project.

## Credits
Acknowledgments and credits for any third-party libraries or tools used in the project.
Netlify Functions Folder
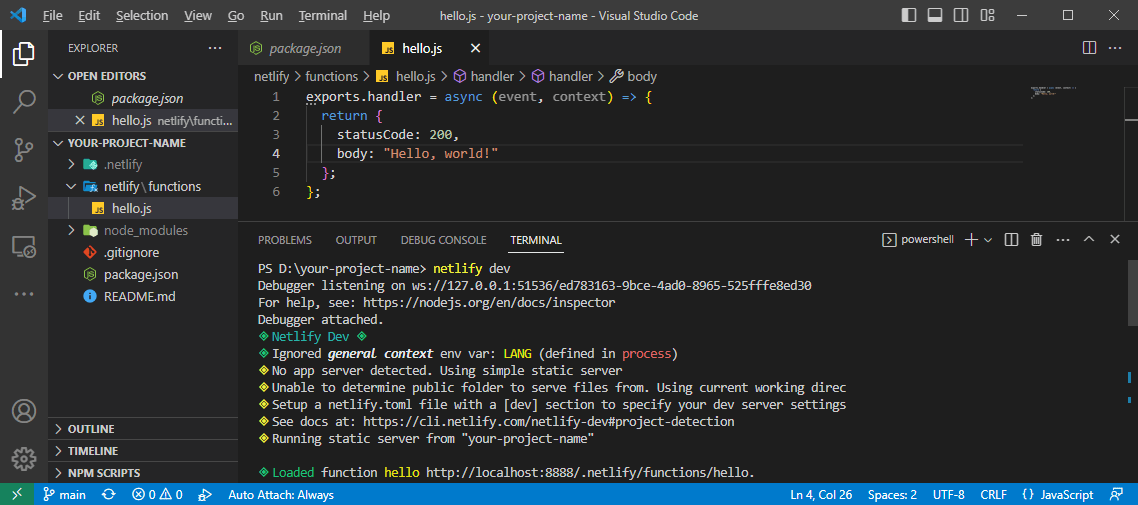
Now, at the root of your project, you'll need to create a nested folder called netlify/functions. This is where we'll put our Netlify serverless function code. You can simply create a new folder called netlify, and then create another folder called functions inside the netlify folder. This will give you the required folder structure.
It's a directory that contains all the serverless functions for your project. These functions can be written in different programming languages, but in this case, we are focusing on JavaScript.
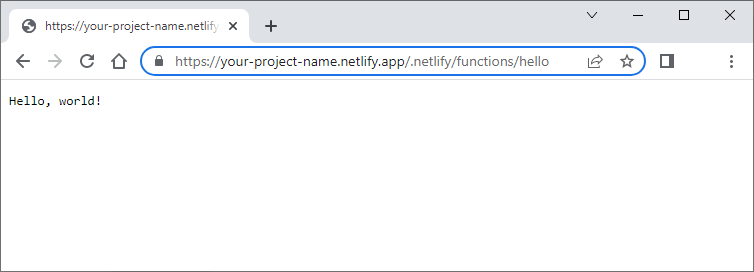
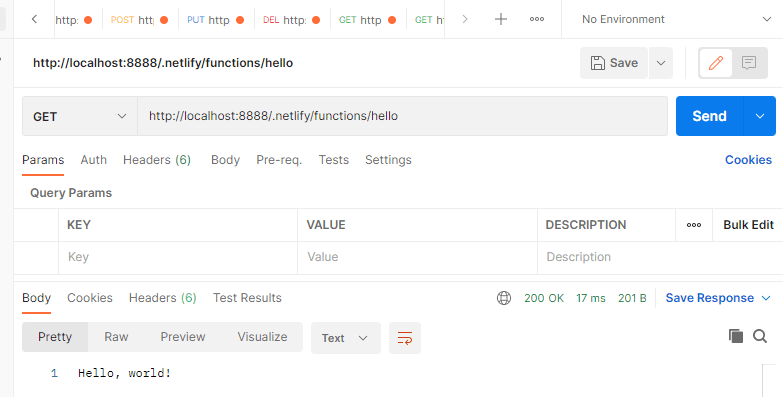
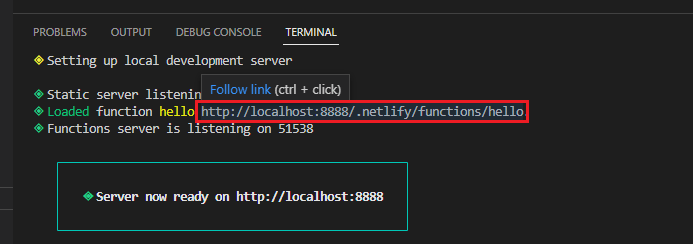
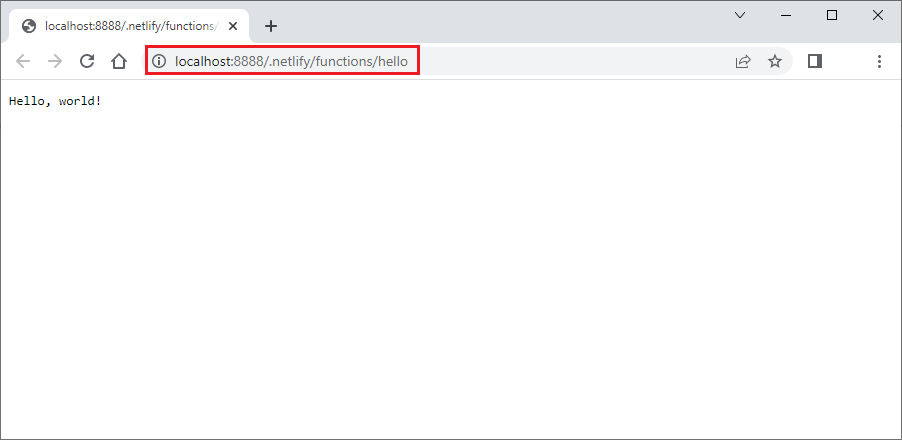
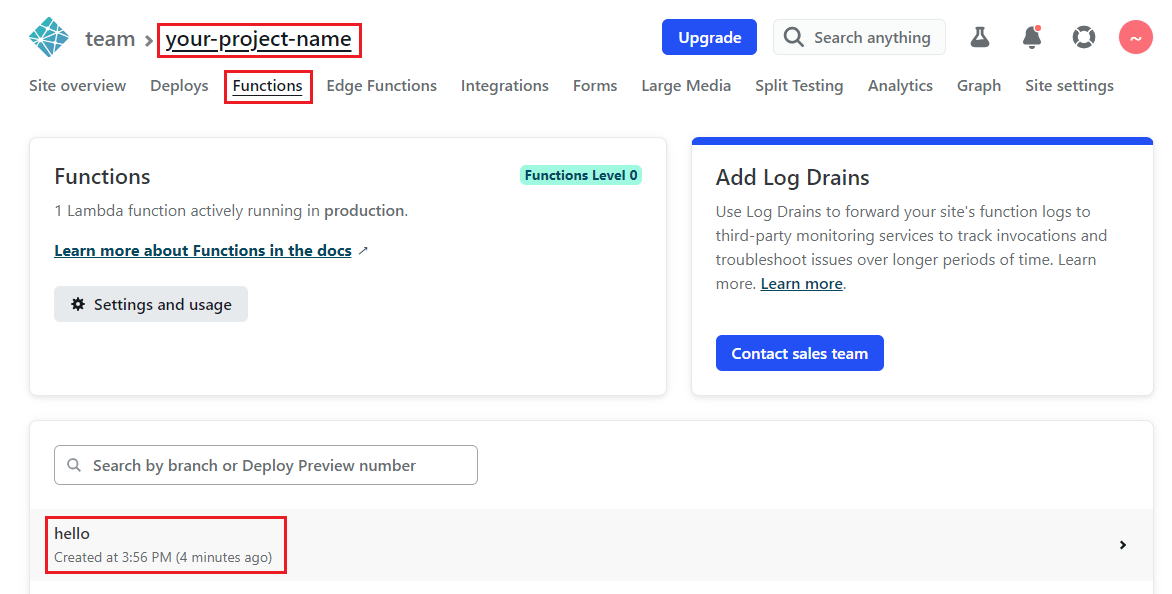
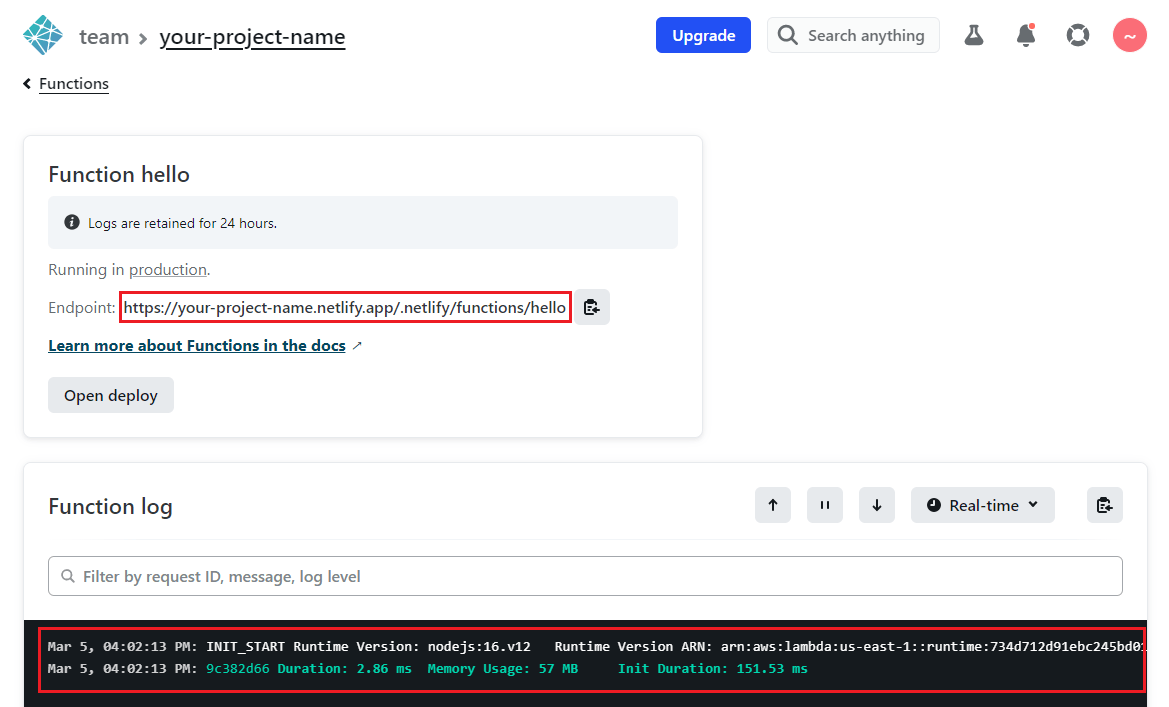
Create a new hello.js file in the "netlify/functions" directory, Netlify will automatically create an API endpoint for your function at "/.netlify/functions/hello".
You can test your function by deploying your project and accessing the API endpoint in your web browser or API client.
It's important to note that the ".netlify" folder is created after you deploy your project to Netlify or use the Netlify CLI locally. This means that if you have not yet deployed your project or used the CLI locally, the folder may not exist yet.
This naming convention makes it easy to organize and access your serverless functions in Netlify. By creating a new file with a unique name in the "functions" folder, Netlify will automatically create a new API endpoint with the same name. This allows you to easily manage and deploy your serverless functions, while also making it easy to access them via their respective API endpoints.
When you deploy your Netlify site, the "netlify/functions" folder is packaged and deployed as AWS Lambda functions. Netlify abstracts away the complexities of managing the Lambda functions and the underlying infrastructure. This makes it easy for developers to build and deploy serverless functions without worrying about the infrastructure.
Here's an example of a simple hello.js file for a Netlify function that returns a "Hello, world!" message:
exports.handler = async (event, context) => {
  return {
    statusCode: 200,
    body: "Hello, world!"
  };
};
Netlify CLI
To run this project locally, you'll need to have Node.js and the Netlify CLI installed. You can install Node.js from the official website, and you can install the Netlify CLI using NPM:
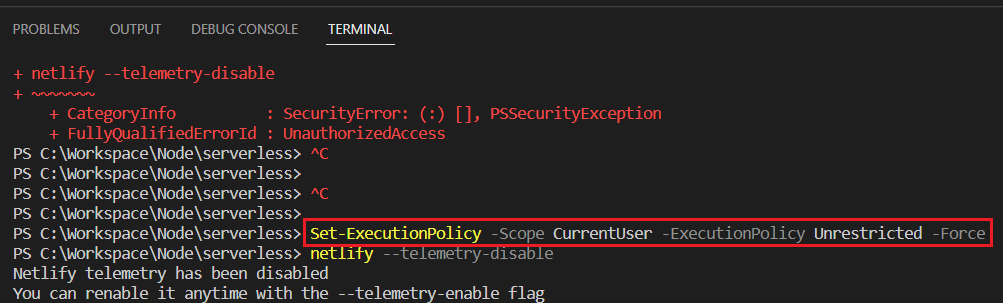
npm install netlify-cli -gBy default, Netlify collects data on usage of Netlify CLI commands, opt out of sharing usage data with the command line:
netlify --telemetry-disable⚠️ Some users reporting an error related to Execution Policies. This is because the script execution policies in PowerShell may be set to a restricted mode by default, preventing the running of scripts.
To solve the "Execution Policies" error, you need to run the following command in the Terminal:
Set-ExecutionPolicy -Scope CurrentUser -ExecutionPolicy Unrestricted -ForceThe PowerShell command "Set-ExecutionPolicy" is used to set the execution policy for scripts in Windows. The option "-Scope CurrentUser" specifies that the policy should be set for the current user only, rather than for the entire computer. The option "-ExecutionPolicy Unrestricted" sets the policy to allow the execution of any script, regardless of its origin or signature. Finally, the "-Force" option bypasses any prompts for confirmation and applies the policy change immediately.
Once you have the dependencies installed, you can run the project locally using the following command:
netlify dev
Serverless Functions API Urls
When you deploy a serverless function to Netlify, it becomes available via a unique URL that includes the prefix "/.netlify/functions/". So if you have a function called "hello" in your Netlify project, you can access it via the URL "/.netlify/functions/hello".
API Gateway is a service provided by AWS that allows you to create, manage, and secure APIs for your applications. When you use Netlify to deploy serverless functions, Netlify abstracts away the complexity of setting up and managing API Gateway, so you can focus on writing your functions and deploying your site.
Under the hood, however, Netlify uses API Gateway to manage your serverless functions. When you deploy your site, Netlify creates a new API Gateway instance for your project, and it automatically configures the necessary routes and permissions for your functions.
This allows you to easily create REST APIs for your applications without worrying about the underlying infrastructure. You can simply write your serverless functions and deploy them to Netlify, and they'll be accessible via their respective URLs.
Creating a Private GitHub Repository for Source Control
After creating the Node.js project and writing the serverless functions, the next step is to upload the project to a source control system so that you can easily manage and deploy your code.
One of the most popular source control systems is Git, and GitHub is one of the most popular Git hosting platforms. You can create a private repository on GitHub and upload your project there. This will allow you to easily collaborate with others, track changes to your code, and deploy updates to your Netlify functions.
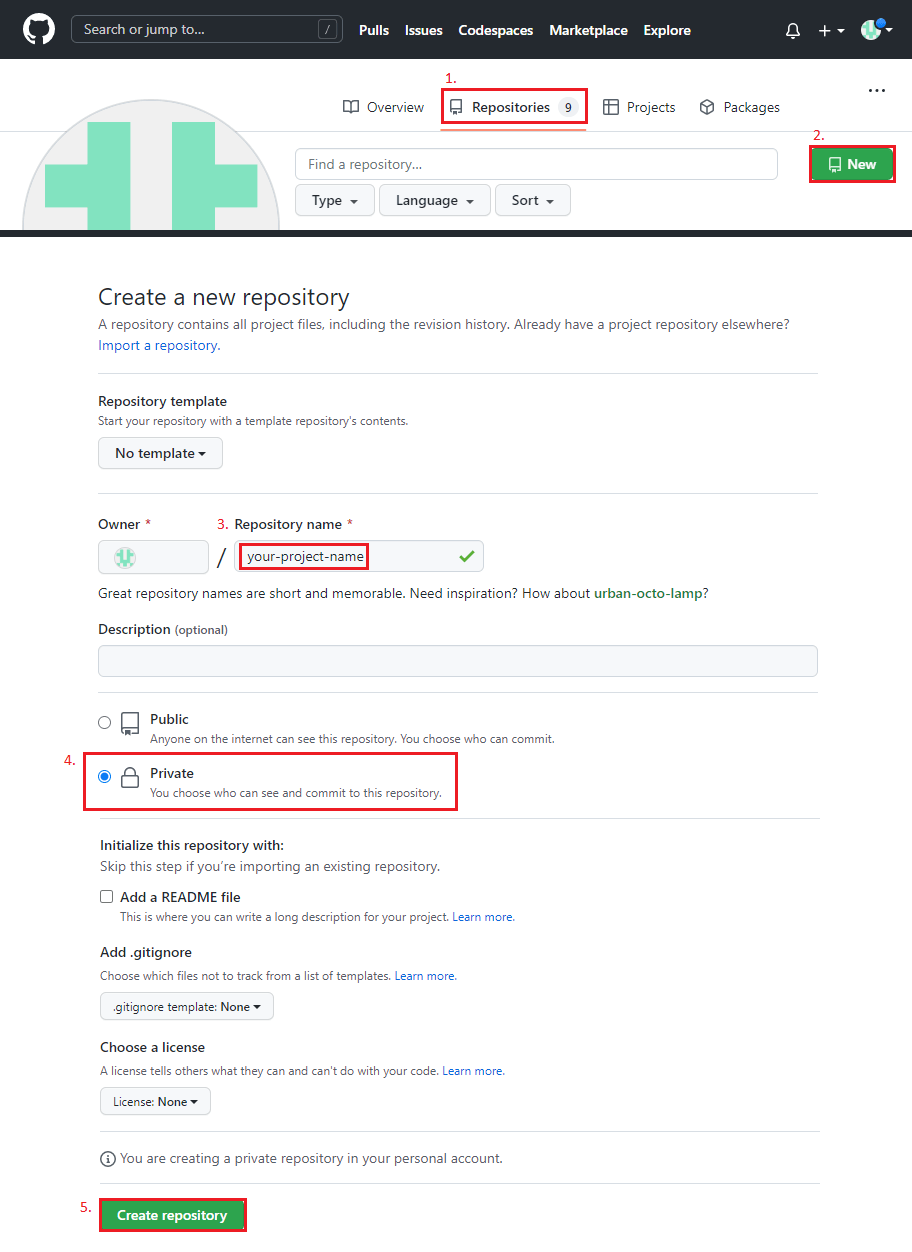
To create a private repository on GitHub, you'll need to sign up for a GitHub account if you haven't already done so. Then, you can create a new repository and choose the "Private" option when prompted. Once you've created the repository, you can link it to your local project and push your code to GitHub.
By using a private repository, you can keep your code secure and limit access to only those who have been granted permission to view and modify the code. It's important to keep your code secure and private, especially if it contains sensitive information or proprietary algorithms.
GitHub: Connecting and Pushing Code to a Remote Repository
To connect the code on your computer to the newly created GitHub repository, you need to follow these steps:
- Before you proceed with the rest of the instructions, you should check to see if you have Git installed on your computer.
To do this, you can open the terminal and type in the command:
git versionIf Git is installed, you should see the version number displayed in the output.
If Git is not installed, install Git from the official Git website.
- Initialize git in your project folder using the command:
git initWhen you run "git init" in a directory, Git creates a hidden directory called ".git" in that directory. This directory contains all of the Git metadata and objects needed to track changes to the files in the directory.
- Add all the files in your project folder to the staging area using the command:
git add .In Git, the add command is used to stage changes for commit. When you make changes to files in your project directory, Git initially marks those changes as unstaged. To include those changes in your next commit, you must first stage them.
The git add command is used to stage changes. The . character is a shortcut that tells Git to stage all changes in the current directory and its subdirectories. So when you use the command git add ., Git will stage all the changes made to files in the current directory and its subdirectories.
- Commit the changes using the command:
git commit -m "first commit"When you use the command git commit, you are essentially creating a snapshot of your project's current state. However, it's important to include a comment that describes the changes you made in this snapshot. This helps you and others who are working on the project understand what changes were made and why.
To include a comment when committing changes, you need to use the -m option followed by the comment in quotes. For example, the command git commit -m "first commit" includes the comment "first commit" with the snapshot of your project's current state.
It's a best practice to include meaningful and descriptive comments for each commit, especially if you're working in a team. This helps everyone understand the changes made to the codebase and makes it easier to revert changes if necessary.
- Branch
git branch -M mainThe git branch command is used to list, create, or delete branches in your Git repository. By default, when you create a new Git repository, it creates a branch called master. However, in recent years, there has been a movement to change the default branch name to main for reasons related to inclusivity and diversity.
The git branch -M main command renames the current branch to main. The -M flag stands for "move/rename" and tells Git to force the rename, even if it conflicts with an existing branch name.
- Add the remote GitHub repository as the origin:
git remote add origin https://github.com/your-username/your-repo.gitThe git remote add command is used to add a new remote repository to your Git project. In this case, the origin is a conventional name given to the primary remote repository. The <repository-url> is the URL of the remote repository, which is typically hosted on a Git hosting service such as GitHub or GitLab.
By running the command git remote add origin <repository-url>, you are telling Git to add a remote repository named origin with the URL <repository-url>. This allows you to push your local changes to the remote repository and also pull down changes from the remote repository to your local copy.
- Push the code to the remote repository using the command:
git push -u origin main
Connecting Netlify to Your GitHub Account
Netlify offers continuous integration and continuous deployment (CI/CD) as part of its platform. This means that when you connect your GitHub repository to Netlify, any changes you push to the repository will automatically trigger a new build and deployment of your website or application.
To connect Netlify to your GitHub account, follow these steps:
-
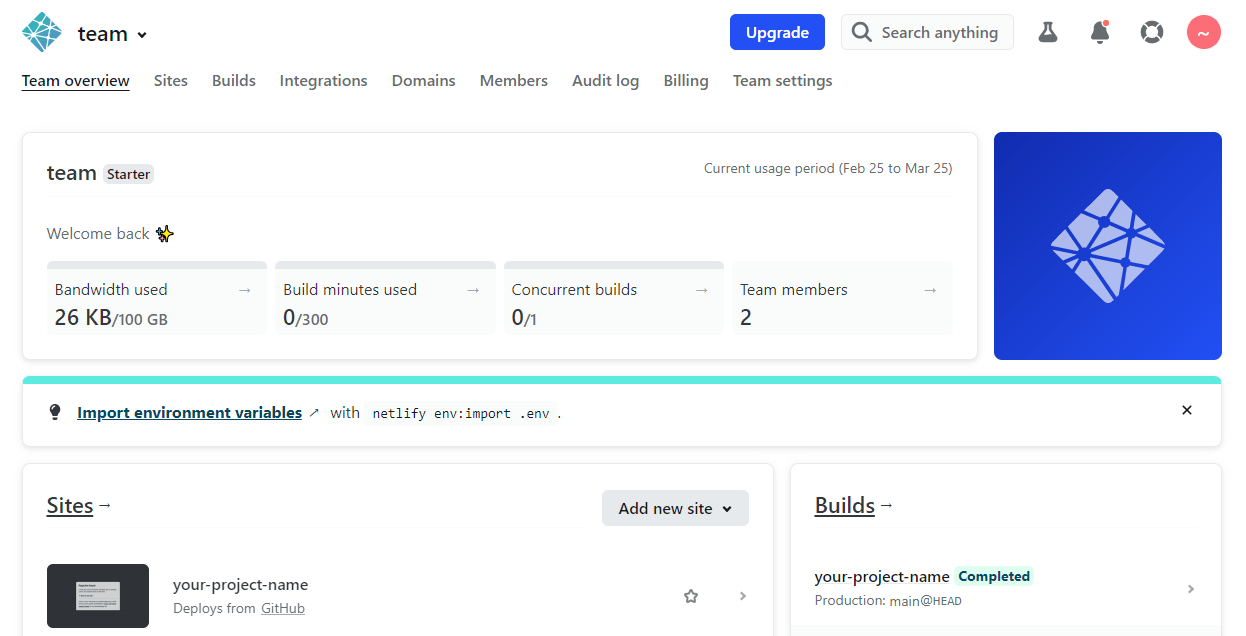
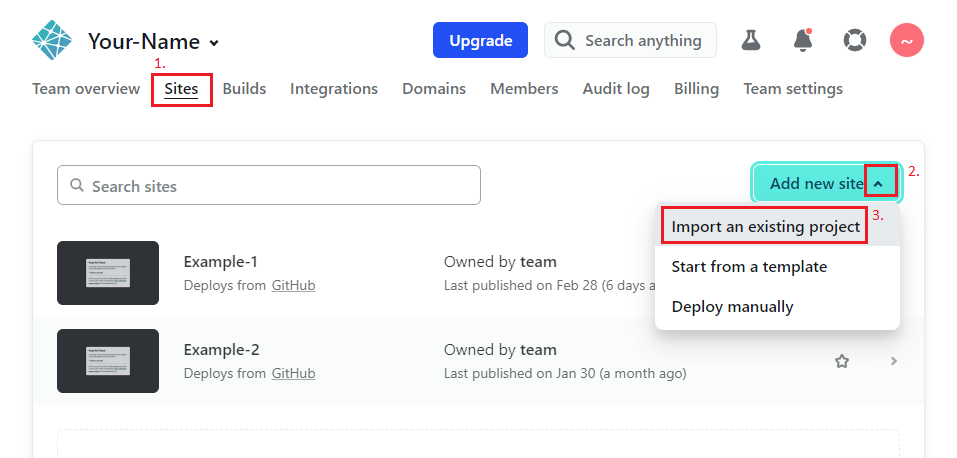
Go to your Netlify dashboard and select the "Sites" tab.
-
Click the "Add new site" button and "Import ana existing project".
-
Select "GitHub" as your Git provider.
-
Follow the prompts to connect your GitHub account to Netlify. You may need to grant Netlify access to your GitHub account.
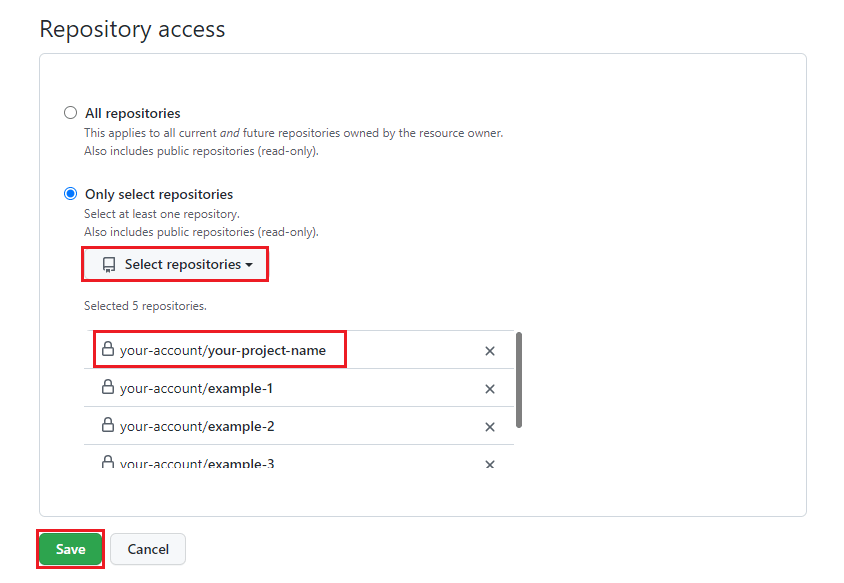
Choosing "Only select repositories" option when connecting Netlify to GitHub means that you are selecting specific repositories from your GitHub account that you want to connect with Netlify. This provides more control and security to your deployment process.
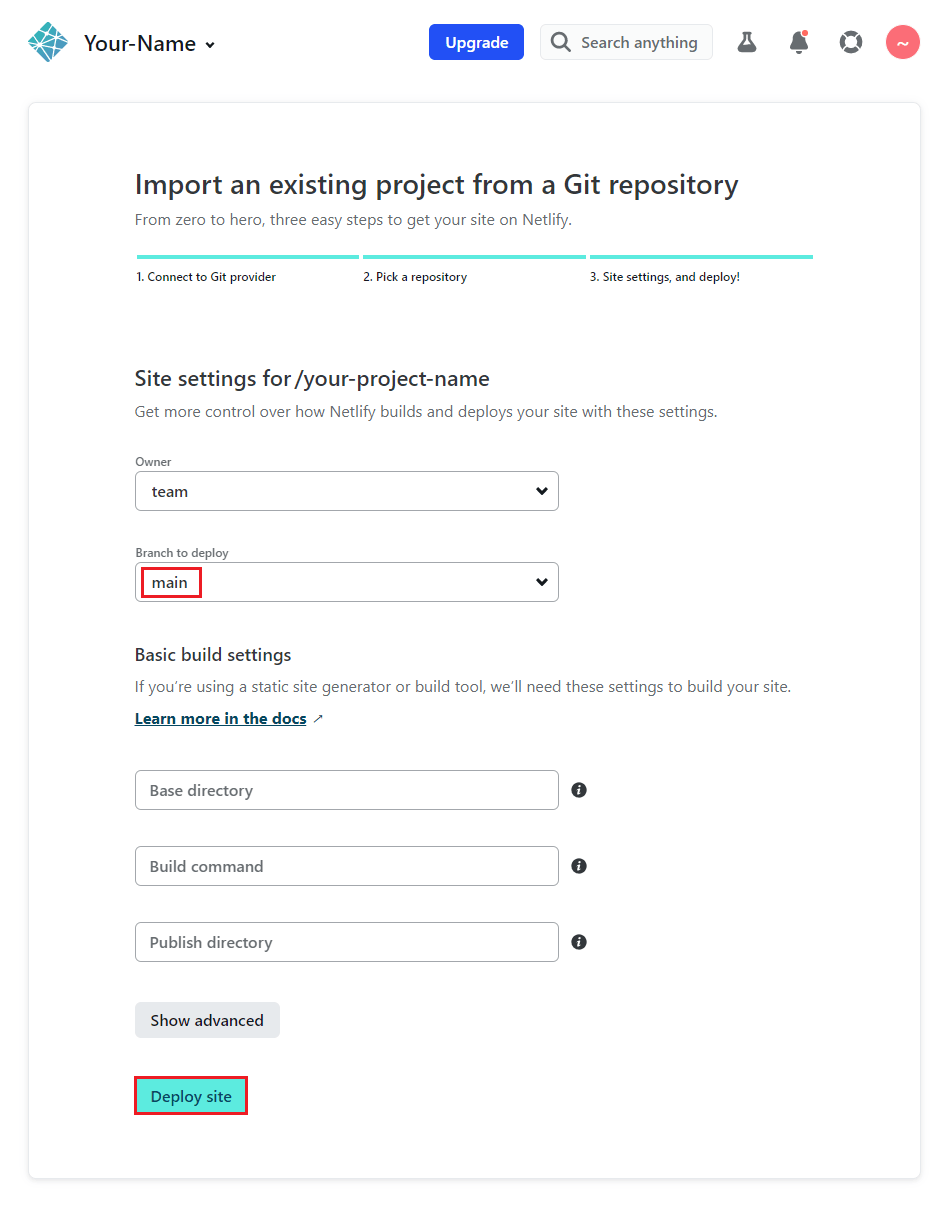
Once your GitHub account is connected, you can pick a repository to deploy to Netlify. In the "Pick a repository" section, select the repository you want to deploy.
If you have created a GitHub repository for your Netlify project, but it's not appearing in the list of available repositories on Netlify, you may need to configure the Netlify app on GitHub. Here's how to do it:
In the "Repository access" section, if you chose "Only select repositories" choose specific repositories. Select the repository you want to link to your Netlify site. Click "Save" to apply the changes.
-
Configure your build settings. This will depend on the type of project you're deploying.
-
Click "Deploy site" to start the deployment process.
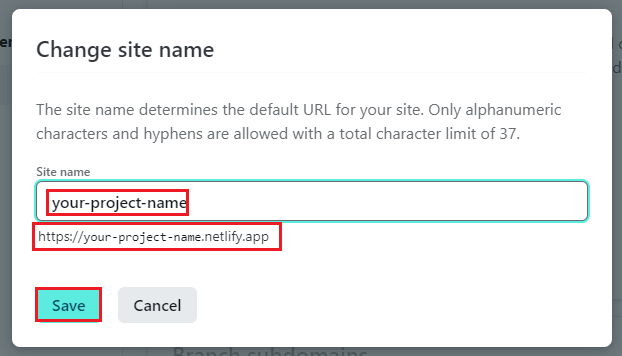
Change Site URL
To change the name of your site on Netlify, you can follow these steps:
-
Click on the "Sites" tab, then click on your project.
-
Click on the "Site settings" button.
-
In the "Site information" section, you will see the current name of your site under the "Site name" field. Click on the "Change site name" button next to it.
-
Enter the new name that you want to use for your site in the "Site name" field.
-
Once you have entered the new name, click on the "Save" button.
Production
The Netlify Functions tab is a section in the Netlify web interface where you can manage your serverless functions. This is where you can view information and logs about your functions.
An endpoint URL is a unique URL that represents a specific resource or function that a web API provides. When a client makes an HTTP request to an API, it typically includes an endpoint URL that identifies the specific resource or function that the client wants to interact with.
The endpoint URL is an important part of the API design, as it defines the structure and organization of the API's resources and functions. By following a consistent and intuitive endpoint URL structure, API developers can make it easier for clients to understand and use their API.
Netlify Functions logs are a way to track the activity of your serverless functions on Netlify. When you deploy your functions to Netlify, the platform keeps a record of every invocation of the functions, along with any errors that occurred during their execution.
To access the logs for your functions, go to the Netlify Functions tab in your Netlify dashboard and click on the function you want to check. You'll see a list of all the invocations of the function, along with a summary of the response and any error messages.
Netlify functions usage refers to the amount of resources consumed by the serverless functions deployed on Netlify.
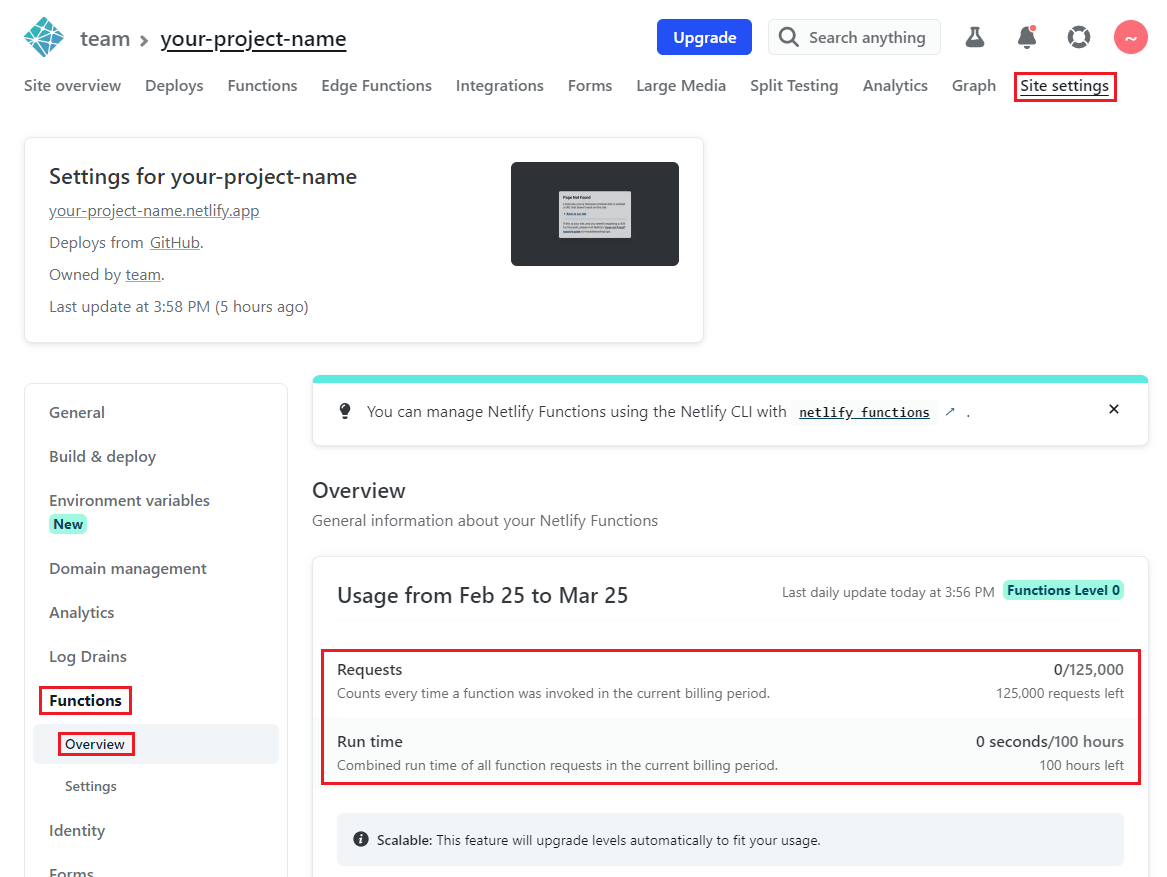
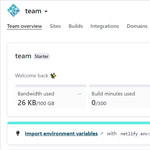
However, Netlify offers up to 500 sites for free with 100GB/month bandwidth, making it an excellent option for personal projects or small businesses.
Summary
We talked about using Node.js and Netlify Functions to create serverless functions for a web application. We discussed how to organize the project and how to use it to create APIs. We also talked about connecting the code to a private GitHub repository and deploying it to Netlify.
Additionally, we talked about changing the site name on Netlify and navigating the Netlify Functions tab. Overall, we explored the process of creating a serverless function with Node.js, connecting it to GitHub, and deploying it to Netlify.
If you enjoyed this article and want to learn more about building a backend API with Serverless Functions, Express, and MongoDB on Netlify, I recommend checking out this tutorial: "Building a Backend API with Serverless Functions, Express and MongoDB on Netlify." It will give you a deeper understanding of how to create a powerful and scalable API for your web application.