Building a Backend API with Netlify Serverless Functions, Express and MongoDB
Explore the advantages of building a serverless API with Netlify Functions (AWS Lambda), including lower infrastructure costs and automatic scaling for improved performance.
Building a Scalable Backend API with Serverless Functions
Building a backend API with Netlify functions (on top of AWS Lambda functions), Node.js, Express, and MongoDB can be a powerful and efficient way to create scalable and cost-effective applications. With the right tools and techniques, developers can create robust and flexible APIs that can be easily deployed and managed on the cloud.
Serverless functions are a great option for building backend APIs because they offer scalability and cost-effectiveness. With serverless functions, you only pay for the time your function runs, not for idle server time. This means that you can save a lot of money on infrastructure costs.
Express is a popular web framework for Node.js that can be used to create serverless functions. It provides a simple and flexible API for handling HTTP requests and responses. This means that you can use Express to create a powerful and flexible API that can handle a wide range of requests and responses.
MongoDB is a NoSQL database that is well-suited for serverless applications. It provides a flexible schema and allows for easy horizontal scaling. This means that you can easily scale your database as your application grows, without having to worry about complex schema changes or data migrations.
The beauty of serverless architecture is that it allows developers to focus on writing code without worrying about the underlying infrastructure.
Netlify is a platform for deploying serverless functions and static sites. It provides a simple and intuitive interface for managing functions and deploying them to the cloud. With Netlify, you can easily deploy your serverless functions and manage them from a single interface.
Requirements
To build a backend API with serverless functions, Express, and MongoDB on Netlify, you will need a few things:
-
Node.js: This is a JavaScript runtime environment that you'll need to run your serverless functions.
-
Visual Studio Code: This is a popular code editor (IDE) that you can use to write your serverless functions.
-
Free GitHub account: You'll need a GitHub account to store your code and connect it to Netlify.
-
Free Netlify account: You can sign up for a free account on their website.
Once you have these tools, you'll be ready to start building your backend API with serverless functions, Express, and MongoDB on Netlify!
If you're new to serverless functions or would like a simple example to get started with, I highly recommend checking out my beginner's tutorial on "Creating Serverless Functions with Node.js, Netlify, and GitHub".
This tutorial will guide you through the process of creating and deploying a basic serverless function on Netlify using Node.js and GitHub. Once you're comfortable with the basics, you can return to this tutorial to learn more advanced concepts and build more complex serverless applications.
Basic Project Structure
The project structure consists of several directories and files. The Netlify CLI creates a ".netlify" directory automatically. This directory contains configuration files for Netlify deployment.
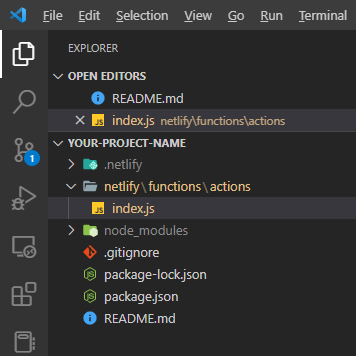
The "netlify" directory contains the serverless functions directory "functions". Inside "functions", there is a subdirectory "actions" that contains the "index.js" file which represents the backend API.
your-project-name/
├── .git/
├── .gitignore
├── .netlify/
├── netlify/
│   └── functions/
│       └── actions/
│           └── index.js
├── node_modules/
├── package.json
├── package-lock.json
└── README.md
The "node_modules" directory contains all the dependencies needed for the project, which are installed using the "package.json" and "package-lock.json" files.
The ".gitignore" file is used to exclude certain files and directories from being tracked by git, while the "README.md" file is used to provide documentation and instructions for the project.
Creating a Simple Express App for Netlify Serverless Function
This code sets up a simple Express app with two route handlers and exports it as a serverless function that can be deployed on Netlify. When a request is made to one of the defined routes, the app will respond with the appropriate message or data.
To use the code, you need to have the dependencies "express" and "serverless-http" installed. To install these dependencies, you can run the following command in your terminal while in the root directory of your project:
npm install express serverless-http
This will download and install the latest versions of the "express" and "serverless-http" packages and their dependencies. Once installed, you can start using them in your project.
// Imports the Express and serverless-http libraries
const express = require('express')
const serverless = require('serverless-http')

const app = express()
const router = express.Router()

// Route handlers are defined using the router.get() method.
router.get('/', (req, res) => {
  res.writeHead(200, { 'Content-Type': 'text/html' })
  res.write("Hello, actions")
  res.end()
})

router.get('/like', (req, res) => {
  res.status(200).json({ "action": "like" });
})

// Path must route to lambda !
// The router is mounted to the app using app.use() with the path '/.netlify/functions/actions'.
// This means that all requests to that path will be handled by the router.
app.use('/.netlify/functions/actions', router)

// The handler property is set to serverless(app), which returns a function that can be deployed as a serverless function.
module.exports.handler = serverless(app)
To run the Express serverless function locally, you need to install the Netlify CLI on your machine. The Netlify CLI provides a command-line interface for working with Netlify projects and functions.
Once you've installed the Netlify CLI, you can run the netlify dev command to start the development server.
This command will spin up a local server that emulates the Netlify serverless environment, allowing you to test your serverless functions and other Netlify features locally.
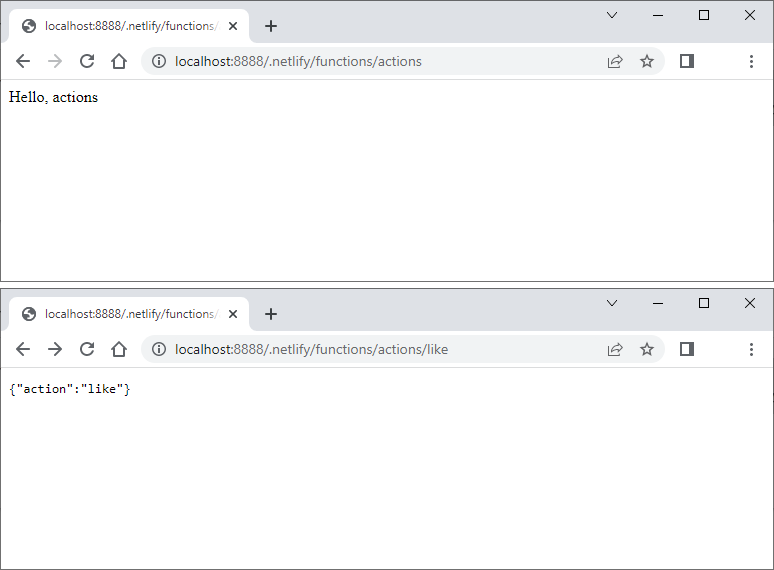
By running the server locally, you can test your API endpoints and make sure everything is working as expected before deploying it to Netlify's serverless environment.
MongoDB
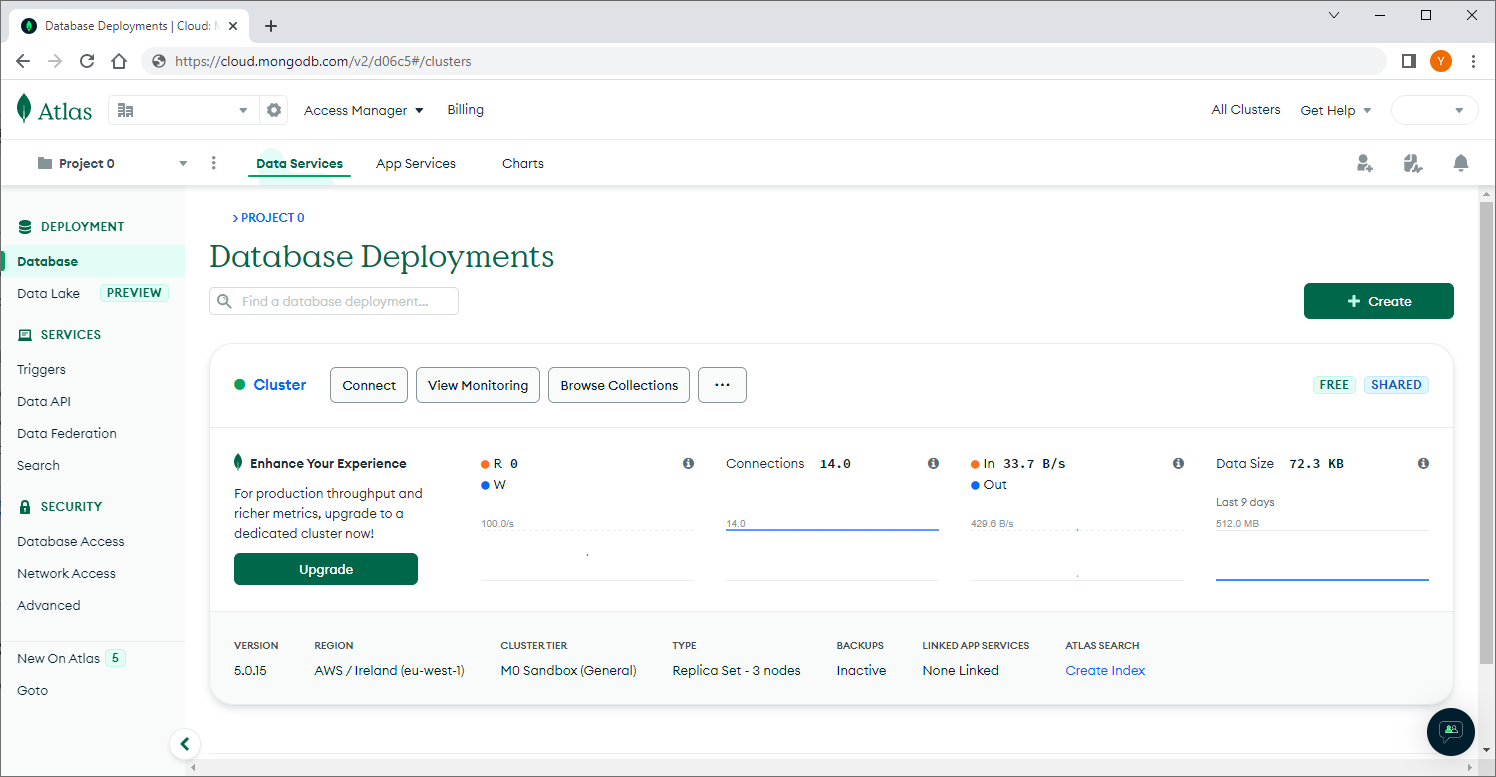
MongoDB Atlas is a fully managed cloud database service that provides high availability, scalability, and security.
MongoDB Atlas offers a free tier cluster for developers to use as a cloud database solution. With this free cluster, you can host up to 512 MB of data storage and connect to it using various programming languages such as Node.js. It also provides various features like automatic scaling, backups, and security features to ensure the safety of your data.
Once you've set up your database, you can use MongoDB Compass, a GUI tool for MongoDB, to explore and manage your data.
To connect to MongoDB Atlas with Compass, you will need to obtain your Atlas connection string, which can be found in your Atlas account dashboard. Once you have your connection string, you can copy and paste it into the "New Connection" screen in MongoDB Compass.
After connecting to MongoDB Atlas with Compass, you can view and manage your databases, collections, and documents through a visual interface. This can be useful for tasks like querying data, creating indexes, and importing/exporting data.
Once you have MongoDB Atlas set up and have created a database, you can use Mongoose to connect to it from your Node.js application.
Network Access Restrictions on MongoDB Atlas
"Network Access" on MongoDB Atlas refers to the ability to control which IP addresses are allowed to connect to your cluster. When you create a new cluster on MongoDB Atlas, it will have network access set to "block all traffic" by default. This means that no IP addresses are allowed to connect to the cluster until you explicitly configure network access.
The current IP address (Public IPv4) is determined by the client's internet service provider and is dynamic, meaning it can change over time. When using MongoDB Compass with MongoDB Atlas, you need to add the current IP address to the Network Access list to allow connections from that IP address to your cluster.
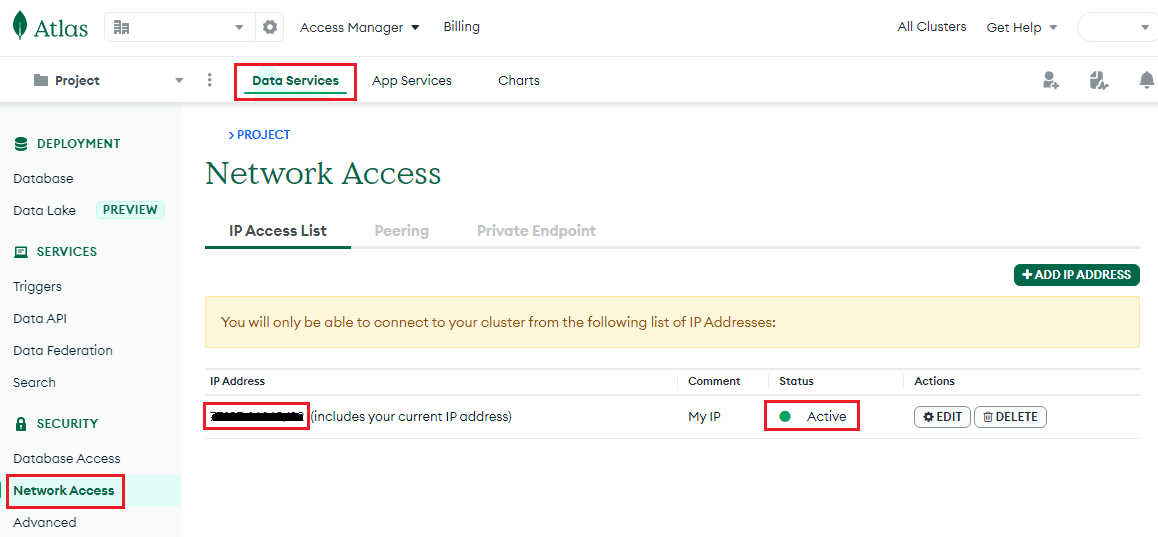
To allow connections to your cluster, you can add one or more IP addresses to the whitelist. These IP addresses can be added by adding individual IP addresses.
It's important to note that once you configure network access, only the IP addresses you've added to the whitelist will be able to connect to your cluster. Any attempts to connect from other IP addresses will be blocked.
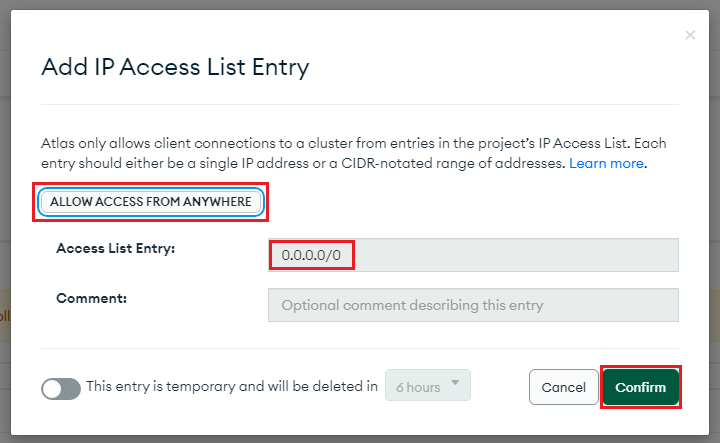
Allow Access from Anywhere in MongoDB Atlas: Risks and Recommendations
Allow access from anywhere (0.0.0.0/0)" is a MongoDB Atlas network permission setting that allows any IP address to connect to your database cluster. By default, MongoDB Atlas only allows connections from approved IP addresses to improve the security of your database.
However, adding "Allow access from anywhere" to the network permission list means that anyone can potentially connect to your database, which is not recommended for production environments. It is a security risk, as it could allow unauthorized access to sensitive data or open up your database to potential attacks.
In some cases, such as for tutorial or learning purposes, it might be easier to allow access from any IP address to simplify the process. But in a real production environment, it is recommended to restrict access to your database only to trusted IP addresses or networks, and use more advanced security features such as VPC peering, IP whitelisting, and encryption to secure your data.
The explanation for allowing access from anywhere and setting security in the node.js function is that in the free plan of both Netlify and MongoDB Atlas, you may not have access to features such as VPC peering, which would allow you to restrict access to specific domains. As a result, allowing access from anywhere becomes the only option.
However, to maintain security, you can use the node.js function to restrict access to only specific domains or localhost for development. This function checks the request's host header to ensure that it is on the allowed hosts list, and if it is not, it sends a "405 Host Not Allowed" status code in the response.
Environment Variables using dotenv
"dotenv" is a zero-dependency module that loads environment variables from a ".env" file into "process.env". This allows you to keep sensitive information like database connection strings outside of your source code and manage them more easily.
npm i dotenv
By using dotenv, you can create a ".env" file to store your environment variables, then load them into your Node.js application using require('dotenv').config(). This makes it easy to keep sensitive information out of your codebase, and also allows you to configure your application more easily when moving between environments like development, staging, and production.
// Load environment variables from a .env file
require('dotenv').config();
Here is an example of how the ".env" file should look like with DB_URL and DB_NAME variables for a MongoDB Atlas database:
DB_URL = "your_mongodb_atlas_database_url"
DB_NAME = "your_database_name"
Make sure to replace your_mongodb_atlas_database_url with your actual MongoDB Atlas database URL and your_database_name with the name of your database.
Environment Variables on Netlify
The .env file is used to define environment variables locally, which are loaded into the application at runtime. However, when deploying to a serverless platform like Netlify, the .env file is not loaded automatically.
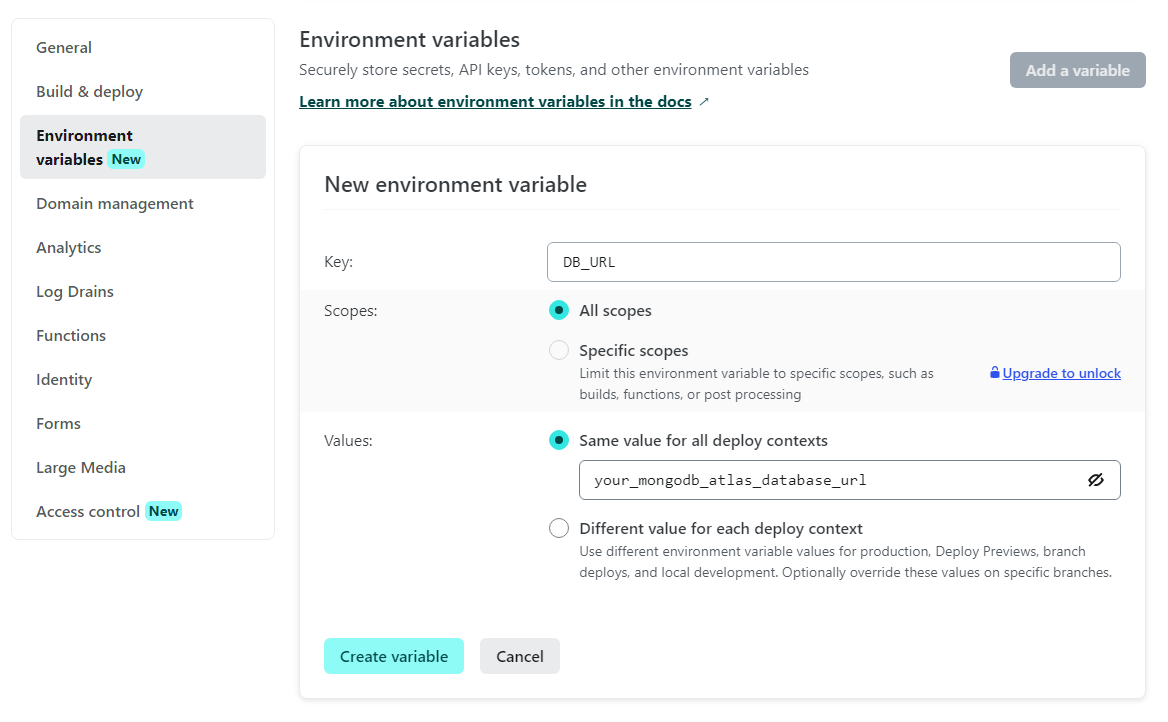
To configure environment variables on Netlify, you can use the Netlify Environment Variables feature. This allows you to define environment variables in the Netlify dashboard, which can then be used in your serverless functions.

To do this:
- Go to your Netlify site dashboard.
- Click on "Site settings".
- On the "General" menu on the left-hand side, click on "Environment variables".
- Click "Add a variables" and add the necessary environment variables (in this case, DB_URL and DB_NAME).
- Save your changes.
Now, when you deploy your serverless functions to Netlify, the environment variables will be available for use.
Using netlify env, you can set, update, delete, and list environment variables for your Netlify site.
This is useful when you need to manage your environment variables from the command line, rather than through the Netlify web interface.
Mongoose
In this next section, we'll cover how to use Mongoose to connect to MongoDB Atlas and define a Schema. This will allow us to work with data in a more structured and organized way. We'll be using Mongoose, which is a popular ODM (Object Data Modeling) library for MongoDB.
With Mongoose, we can define a Schema for our data and then create models based on that Schema. These models will provide us with an interface to interact with the database and perform CRUD operations.
To get started, you will need to install Mongoose in your project using npm. You can do this by running the following command in your project directory:
npm i mongoose
This function named "connectToDB" uses the Mongoose library to connect to a MongoDB database. The function first sets an option in Mongoose to enforce strict mode for queries. It then uses the mongoose.connect method to connect to a database whose URL and name are specified in environment variables DB_URL and DB_NAME, respectively. Finally, the function logs a message to the console indicating that the connection was successful.
const connectToDB = async () => {
  try {
      mongoose.set('strictQuery', true);
      mongoose.connect(`${process.env.DB_URL}/${process.env.DB_NAME}`)
      .then(() => console.log('mongoose Connected!'));
  } catch (error) {

  }
}

connectToDB()
Mongoose Schema
A Mongoose schema is a blueprint for defining the structure of documents (i.e., data objects) in a MongoDB collection. It defines the fields and their data types that are allowed in the collection and provides options for setting default values, defining validators, and more.
const actionsSchema = new mongoose.Schema({
  url: {
    type: String,
    required: true,
    unique: true
  },
  like: {
    type: Number,
    default: 0
  },
  share: {
    type: Number,
    default: 0
  },
  subscribe: {
    type: Number,
    default: 0
  }
});
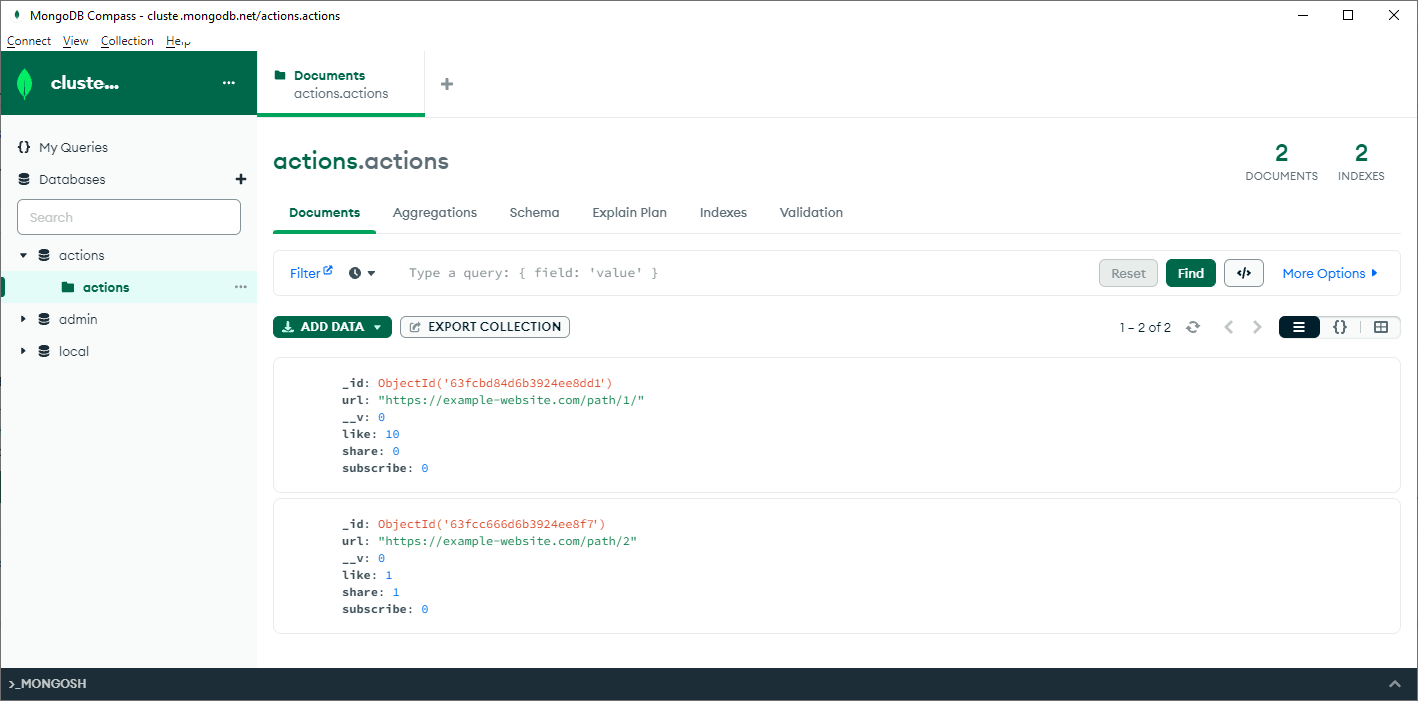
In this example, the schema defines a collection of documents that represent actions taken on a specific URL. It has four fields: url, like, share, and subscribe.
- The
urlfield is a required string field that must be unique across all documents in the collection. - The
like,share, andsubscribefields are number fields that have default values of 0.
Once a schema is defined, you can use it to create a Mongoose model, which is a constructor that creates new documents that conform to the schema. You can also perform CRUD (Create, Read, Update, and Delete) operations on the collection using the model's methods.
MongoDB Compass is a powerful GUI tool for managing MongoDB databases. This screenshot shows a successful connection to a MongoDB Atlas cluster, allowing for easy access to the database's collections and documents. The screenshot also displays examples of a schema, showcasing the flexibility and versatility of MongoDB's document-based data model.

Mongoose Model
Did you know that Mongoose models provide a number of useful features? For instance, they can validate documents against the schema, ensuring that required fields are present and that data types are correct.
Plus, Mongoose provides a powerful query API that allows you to find, update, and delete documents in the database using a simple and intuitive syntax.
Another great thing about Mongoose models is that they support middleware functions that can be executed before or after specific model methods are called, allowing you to modify or validate data before it is saved or returned.
Improving Code Organization
To make your code more organized and maintainable, you may want to consider changing the structure of your project as it grows in complexity. One way to achieve this is by dividing your code into separate files using JavaScript's module.exports. By doing this, you can break down your code into smaller, more manageable parts, which can make it easier to debug and maintain.
For example, you could create separate files for different modules or functions, and then export them using module.exports This way, you can keep related code together in a single file, which can make it easier to understand the purpose of each module or function. Additionally, by using this approach, you can avoid having a large and unwieldy file that can be difficult to navigate.
Overall, dividing your code into separate files using module.exports can help you keep your codebase clean and organized. This can ultimately save you time and effort in the long run, as it can make it easier to add new features, fix bugs, and make changes to your code.
Full Code for New Project Structure
./netlify/function/action/index.js
This file is the entry point for the Netlify function.
const express = require('express')
const serverless = require('serverless-http')
const router = require('./router');

require('dotenv').config();

const app = express()

app.use(function(req, res, next) {
  const allowedHosts = ['your-project-name.netlify.app', 'localhost:8888'];
  const host = req.headers.host;
  console.log(`host: ${host}`)

  if (allowedHosts.includes(host)) {
    next();
  }
  else {
    return res.status(405).send('Host Not Allowed');
  }
});

app.use('/.netlify/functions/actions', router)

module.exports.handler = serverless(app)
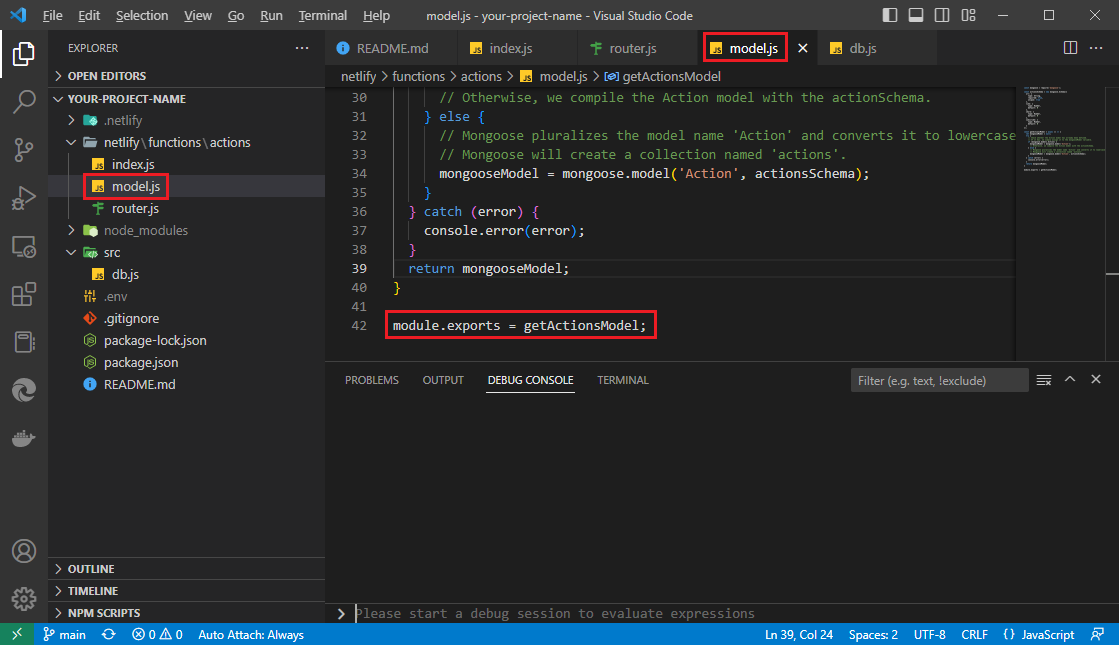
./netlify/function/action/model.js
This file defines the schema for the MongoDB Action collection, using mongoose. It exports a function getActionsModel that returns the Action model instance or creates it if it doesn't exist.
const mongoose = require('mongoose');

const actionsSchema = new mongoose.Schema({
  url: {
    type: String,
    required: true,
    unique: true
  },
  like: {
    type: Number,
    default: 0
  },
  share: {
    type: Number,
    default: 0
  },
  subscribe: {
    type: Number,
    default: 0
  }
});

const getActionsModel = async () => {
  let mongooseModel = null;
  try {
    if (mongoose.models.Action) {
      mongooseModel = mongoose.model('Action'); // 'actions' collection
    } else {
      mongooseModel = mongoose.model('Action', actionsSchema); // 'actions' collection
    }
  } catch (error) {
    console.error(error);
  }
  return mongooseModel;
}

module.exports = getActionsModel;
./netlify/function/action/router.js
This file defines the routing logic for the Netlify function. It requires the express and router modules, as well as the getActionsModel function from model.js and the connectToDB function from 'src/db.js'. It exports an instance of the router, with two routes: '/' which returns a "200 OK" response with a JSON message "test: Hello", and '/like' which expects a url parameter and increments the like field for the corresponding url in the 'actions' collection.
const express = require('express')
const connectToDB = require('../../../src/db')
const getActionsModel = require('./model')
const router = express.Router()

const incrementAction = async (req, res, url, actionName) => {
  await connectToDB();

  const MongooseModelAction = await getActionsModel();

  if (!MongooseModelAction) {
    res.status(500).send('Action not defined');
    return;
  }

  try {
    const action = await MongooseModelAction.findOneAndUpdate(
      { url },
      { $inc: { [actionName]: 1 } },
      { upsert: true, new: true }
    );

    res.status(200).json({ [actionName]: action[actionName] });
  } catch (error) {
    console.error(error);
    res.status(500).send('Server Error');
  }
};

router.get('/', (req, res) => {
  res.status(200).json({ "test": "Hello"});
})

router.get('/like', async (req, res) => {
  const url = req.query.url;
  if (!url) {
    res.status(400).send("Missing url parameter");
  } else {
    await incrementAction(req, res, url, 'like');
  }
});

module.exports = router;
./src/db.js
This file exports an async function connectToDB which connects to a MongoDB database using the mongoose module. The connection URL and database name are read from the .env file.
const mongoose = require('mongoose');

const connectToDB = async () => {
  try {
    mongoose.set('strictQuery', true);
    mongoose.connect(`${process.env.DB_URL}/${process.env.DB_NAME}`)
    .then(() => console.log("mongoose Connected!"));
  } catch (error) {
    console.log(error);
    console.log("mongoose Error");
  }
}

module.exports = connectToDB;
./.env
As I said before, it is important to note that the '.env' file contains sensitive information, including the database connection URL and database name.
DB_URL = "your_mongodb_atlas_database_url"
DB_NAME = "your_database_name"
Summary
This tutorial covered how to build a serverless API using Netlify Functions and MongoDB Atlas. We went through the process of setting up the MongoDB Atlas database, connecting to the database from our Netlify Functions, and creating a simple API to increment and retrieve action metrics.
We started by setting up the MongoDB Atlas account and created a new database. We then created a Netlify site and added environment variables for the database connection details. We installed the necessary dependencies for our project, including Express, Mongoose, and Serverless HTTP.
Next, we created a 'model.js' file to define our data schema, and a 'router.js' file to define the routes for our API. We then created an 'index.js' file that imports the router and sets up middleware to restrict API access to specific hosts. We also created a 'db.js' file to connect to our MongoDB Atlas database.
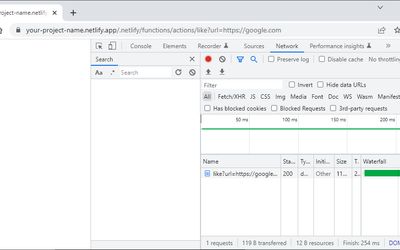
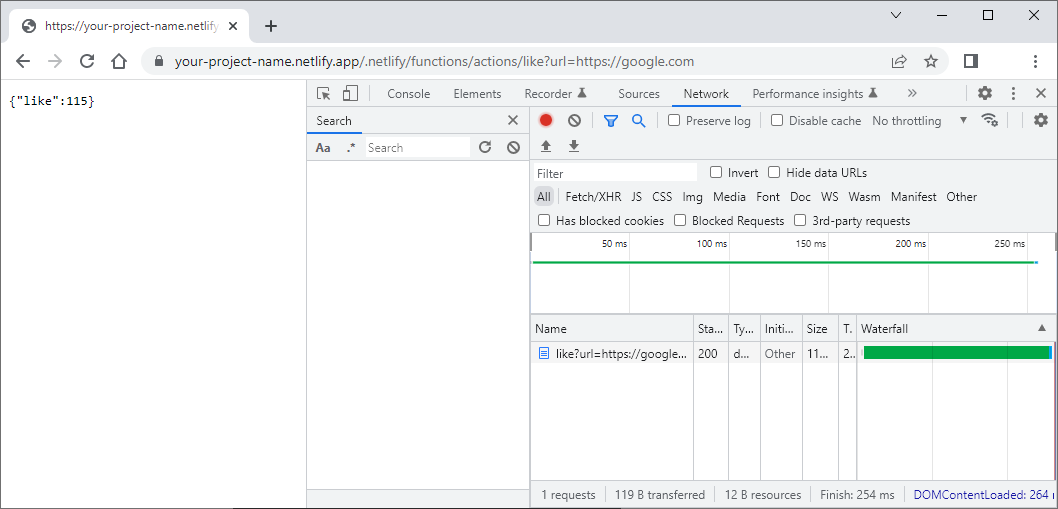
After creating our files, we tested our API by sending requests to the endpoints. We used the Chrome browser to test the API endpoints and verified that the actions were being incremented in the MongoDB Atlas database.
I recommend trying to write the code yourself as it can help you better understand the concepts and techniques used in this tutorial. Don't worry if you make mistakes or encounter errors, it's all part of the learning process. Feel free to experiment and modify the code to fit your needs. Good luck!
References
Related Articles