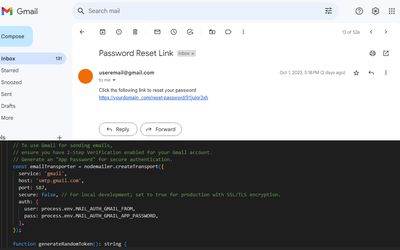
Send Password Reset Email With Node.js and Gmail (TypeScript)

Learn how to send email with node.js, nodemailer and gmail account.

Gmail 2-Step Verification and App Passwords
When it comes to sending emails through services like Gmail, it's important to note that you don't use your regular login password that you typically use to access your email account.
Instead, you need to create a specific type of password called an "App passwords." The reason for this extra layer of security is to protect your main account credentials.
To set up an App Passwords, you must first ensure that your email account has 2-Step Verification enabled. This is a critical security feature that requires you to provide not only your password but also a verification code sent to your mobile device when logging in.
Google Account - Security Settings

Once 2-Step Verification is active, you can generate an App Passwords. This unique password is exclusively used for applications or devices that need access to your email account, such as sending emails from a web application or configuring an email client.
Google Account - App passwords


Next, you provide the application with your email address and the unique App Password you generated:
const emailTransporter = nodemailer.createTransport({
  service: 'gmail',
  host: 'smtp.gmail.com',
  port: 587,
  secure: false, // For local development; set to true for production with SSL/TLS encryption.
  auth: {
    user: 'youremail@gmail.com',
    pass: 'your pass from goog', // 16-character password
  },
});
.env file
In the code, you'll see that I've stored the email address and the App Password in a designated file named .env. Think of it as a confidential vault for sensitive data within our application.
Instead of hardcoding our email and password directly into the code (which is a big no-no for security), we use these variables. It helps keep our credentials protected and out of sight.
Here's how it looks inside the .env file:
MAIL_AUTH_GMAIL_FROM='youremail@gmail.com'
MAIL_AUTH_GMAIL_APP_PASSWORD='your pass from goog'
The Process
Let's break down the process of initializing a password reset link with a token.
1. Initializing a Password Reset Link (/init-reset-link):
Imagine a user wants to reset their password. Here's how we help them:
- User Input: The user provides their email, saying, "Hey, I forgot my password, and I need to reset it." We get this email through our
/init-reset-linkroute. - Check Email: We first make sure the email is valid and belongs to a real user in our system. We don't want to send reset links to just anyone.
- Generate Token: If the email is legit, we create a special code called a "token." It's a random string of characters, like a secret key.
- Store Token: We keep a record of this token along with the user's email. Think of it like putting a label on a box with the user's name on it. We store these boxes (tokens) somewhere safe temporarily.
- Send Email: We send an email to the user's address with a link that includes this token. The link is like an entrance ticket to reset their password.
2. Resetting the Password (/reset-password/:token):
Now, let's see what happens when the user clicks that link to reset their password:
- User Clicks Link: The user clicks on the link they received in their email. This link leads to our
/reset-password/:tokenroute. The :token part is like a code on their ticket. - Find Token: We check the code on their ticket (the token) and see if it matches any of the boxes (tokens) we stored earlier.
- Matching Token: If we find a match, we know which user the token belongs to. It's like finding the right box with their name on it.
- Reset Password: With the user's identity confirmed, we let them reset their password. We'll ask them to enter a new, secure password.
- Password Update: We take this new password, make it super secure by using a special tool (like bcrypt), and update it in our records for that user.
- Success or Error: Finally, we tell the user if everything went well, and their password has been reset. But if the token is expired or invalid (maybe someone tried to use an old link), we let them know that it didn't work.
That's the process! The token is like a secret handshake that ensures only the right person can reset their password. It keeps everything safe and secure.
The Code
Here is the source code for implementing a password reset feature.
interfaces.ts
interface UserInterface {
  username: string;
  email: string;
  passwordhash: string;
}

interface UserModelInterface {
  createUser(user: UserInterface): Promise<UserInterface | undefined>;
  findUserByUsername(username: string): Promise<UserInterface | undefined>;
  findUserByEmail(email: string): Promise<UserInterface | undefined>;
  setNewPassword(email: string, newPasswordHash: string): Promise<boolean>;
}
UserService.ts
import { UserInterface, UserModelInterface } from './interfaces';

class UserService {
  private userModel: UserModelInterface;

  constructor(userModel: UserModelInterface) {
    this.userModel = userModel;
  }

  async isUsernameTaken(username: string): Promise<boolean> {
    const user = await this.userModel.findUserByUsername(username);
    return !!user;
  }

  async isEmailTaken(email: string): Promise<boolean> {
    const user = await this.userModel.findUserByEmail(email);
    return !!user;
  }

  async createUser({ username, email, passwordhash }: UserInterface): Promise<any> {
    const newUser = await this.userModel.createUser({
      username,
      email,
      passwordhash: passwordhash,
    });

    return newUser;
  }

  async setNewPassword(email: string, newPasswordHash: string): Promise<boolean> {
    // Call the setNewPassword method of the userModel
    const passwordUpdated = await this.userModel.setNewPassword(email, newPasswordHash);

    return passwordUpdated;
  }
}

export default UserService;
PasswordResetRouter.ts
import express, { Request, Response, Router } from 'express';
import bodyParser from 'body-parser';
import nodemailer from 'nodemailer';
import bcrypt from 'bcrypt';
import { UserModelInterface } from './interfaces';
import UserService from './UserService';

class PasswordResetRouter {
  private router: Router = express.Router();
  private userService: UserService;

  constructor(userModel: UserModelInterface) {
    this.userService = new UserService(userModel);
    this.initializeRoutes();
  }

  private initializeRoutes(): void {
    // Middleware
    this.router.use(bodyParser.json());
    this.router.use(bodyParser.urlencoded({ extended: true }));

    // TODO: Replace with your database connection setup
    // In-memory array for storing reset tokens
    const resetTokens: { email: string; token: string }[] = [];

    // To use Gmail for sending emails,
    // ensure you have 2-Step Verification enabled for your Gmail account.
    // Generate an "App Password" for secure authentication.
    const emailTransporter = nodemailer.createTransport({
      service: 'gmail',
      host: 'smtp.gmail.com',
      port: 587,
      secure: false, // For local development; set to true for production with SSL/TLS encryption.
      auth: {
        user: process.env.MAIL_AUTH_GMAIL_FROM,
        pass: process.env.MAIL_AUTH_GMAIL_APP_PASSWORD,
      },
    });

    function generateRandomToken(): string {
      return Math.random().toString(36).substr(2, 10);
    }

    // Endpoint to initiate a password reset link
    this.router.post('/init-reset-link', async (req: Request, res: Response) => {
      const { email } = req.body;

      // Check if the email exists in your database (you should validate the email here)
      const isEmailTaken = await this.userService.isEmailTaken(email);
      if (!isEmailTaken) {
        return res.status(400).json({ message: 'Email not found.' });
      }

      const token = generateRandomToken();

      // Store the email and token for future verification
      resetTokens.push({ email, token });

      // Send a password reset link to the user's email
      const resetLink = `https://yourdomain.com/reset-password/${token}`;

      const mailOptions = {
        from: process.env.MAIL_AUTH_GMAIL_FROM,
        to: email,
        subject: 'Password Reset Link',
        text: `Click the following link to reset your password: ${resetLink}`,
      };

      emailTransporter.sendMail(mailOptions, (error: Error | null) => {
        if (error) {
          console.error(error);
          res.status(500).json({ message: 'An error occurred while sending the reset link.' });
        } else {
          res.json({ message: 'Password reset link sent successfully.' });
        }
      });
    });


    // Endpoint to reset the password
    this.router.post('/reset-password/:token', async (req: Request, res: Response) => {
      const { token } = req.params;
      const { password } = req.body;

      // Find the email associated with the token
      const resetToken = resetTokens.find((item) => item.token === token);

      if (!resetToken) {
        return res.status(404).json({ message: 'Invalid or expired reset token.' });
      }

      const saltRounds = 10;
      const passwordhash = await bcrypt.hash(password, saltRounds);
      const passwordUpdated = await this.userService.setNewPassword(resetToken.email, passwordhash);
      if (passwordUpdated) {
        return res.json({ message: 'Password reset successfully.' });
      } else {
        return res.status(500).json({ message: 'Failed to update the password.' });
      }
    });
  }

  public getRouter(): Router {
    return this.router;
  }
}

export default PasswordResetRouter;
Conclusion
What's next? While the provided code lays a solid foundation for password reset functionality, there's always room for enhancement.
Consider implementing features like token expiration for added security, user notifications for successful password resets, and a more robust data storage solution for tokens.
Continuously staying updated with security best practices and exploring newer libraries or technologies can further refine this code for a top-notch user experience.


